Python: 3.8.2
discord.py: 1.3.3
挨拶、Khabrovitesおよび他のインターネットユーザー。今日は、discord.pyライブラリを使用してDiscordボットを作成するための一連の記事を開始します。モジュールを使用して、プリミティブボットと「高度な」ボットの両方を作成する方法を見ていきます。この記事では、標準コマンドと別の小さなコマンドを作成します。始めましょう!
ボットを作成してトークンを取得する
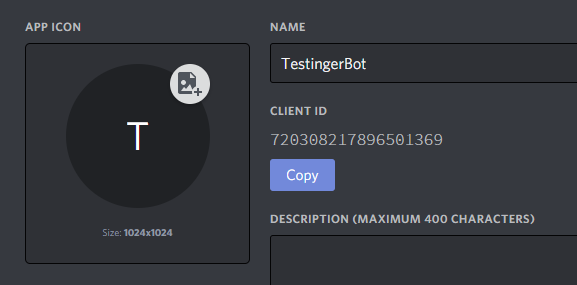
ボットをサーバーに追加するには、独自のアプリケーションを作成し、[一般情報]タブでクライアントIDをコピーする必要があります。

ここでは、CLIDを以前にコピーしたクライアントIDに置き換えます。
https://discordapp.com/oauth2/authorize?&client_id=CLID&scope=bot&permissions=8[ボット]タブで、ボットを作成してトークンをコピーします。

コーディング
ライブラリ自体をインストールします。
pip install discordconfig.pyファイルを作成し(これはより便利です)、そこに辞書を作成します。
settings = {
    'token': ' ',
    'bot': ' ',
    'id': Client ID ,  ,
    'prefix': ' '
}
メインファイルを作成します。名前は何でもかまいません。
ライブラリと構成ファイルをインポートします。
import discord
from discord.ext import commands
from config import settings
ボット「body」を作成します。名前は次のいずれかになります。
bot = commands.Bot(command_prefix = settings['prefix']) # settings, prefix.メインコードを書き始めましょう。
@bot.command() #    pass_context,        .
async def hello(ctx): #      ctx.
    author = ctx.message.author #   author      .

    await ctx.send(f'Hello, {author.mention}!') #     ,    author.
最後に、次のコマンドでボットを起動します。
bot.run(settings['token']) # settings token, import discord
from discord.ext import commands
from config import settings
bot = commands.Bot(command_prefix = settings['prefix'])
@bot.command() # pass_context, .
async def hello(ctx): # ctx.
author = ctx.message.author # author .
await ctx.send(f'Hello, {author.mention}!') # , author.
bot.run(settings['token']) # settings token, 次のようになります。

ボーナスチュートリアル!
キツネとのランダムな写真の結論を出しましょう
これを行うには、さらにいくつかのライブラリをインポートします。
import json
import requests
コマンドを書き始めましょう。
@bot.command()
async def fox(ctx):
    response = requests.get('https://some-random-api.ml/img/fox') # Get-
    json_data = json.loads(response.text) #  JSON

    embed = discord.Embed(color = 0xff9900, title = 'Random Fox') #  Embed'a
    embed.set_image(url = json_data['link']) #   Embed'a
    await ctx.send(embed = embed) #  Embed
次のようになります。

終わり
これでパート1は完了です。パート2はもうすぐです。