記事の最初の部分では、aarch64用のQEMUエミュレーターを使用し、2番目の部分では、Raspberryエミュレーターを起動して、その中のアプリケーションの機能を確認します。
私自身のために、これらすべてが迅速に行われるわけではないことに注意したいと思います。これらすべてを実行しようとすると、完全なサイクルに数日かかります!)
CentOSARMのQtソースからの構築
ホストシステムにインストールするには、QEMUエミュレーターをインストールする必要があります。 Debianベースのディストリビューションでは、これはqemu-system-armパッケージです。仮想マシンをグラフィカルモードで管理するには、virt-managerをインストールします。
起動後、仮想マシンを作成
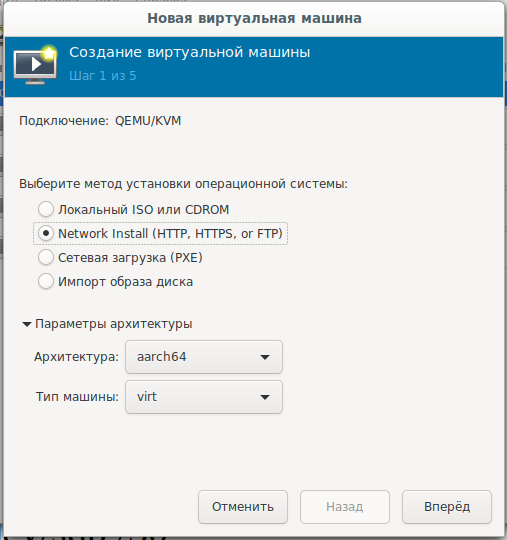
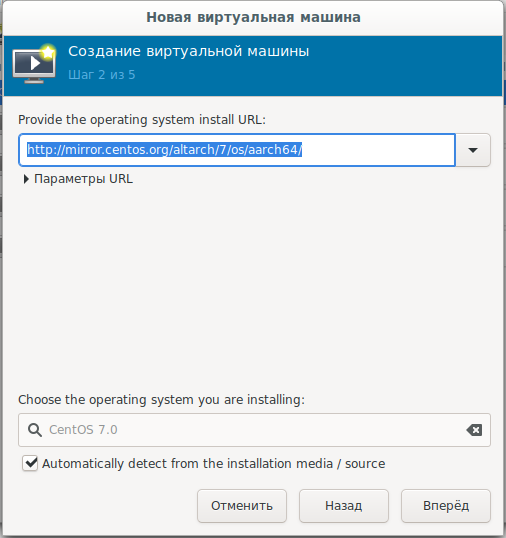
し、ネットワークブート
カールを選択します:mirror.centos.org/altarch/7/os/aarch64
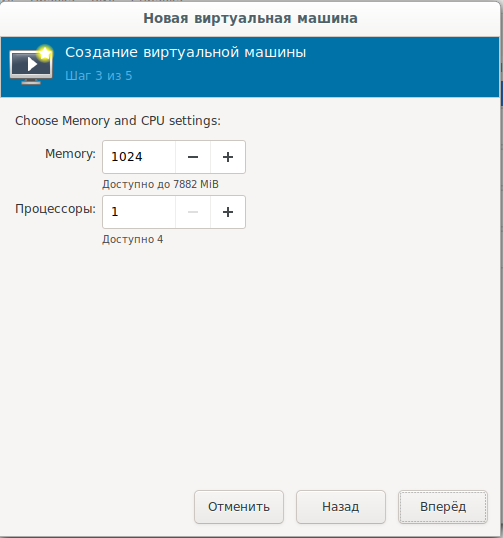
プロセッサとRAMの数を 設定します
:システムディスクのサイズを
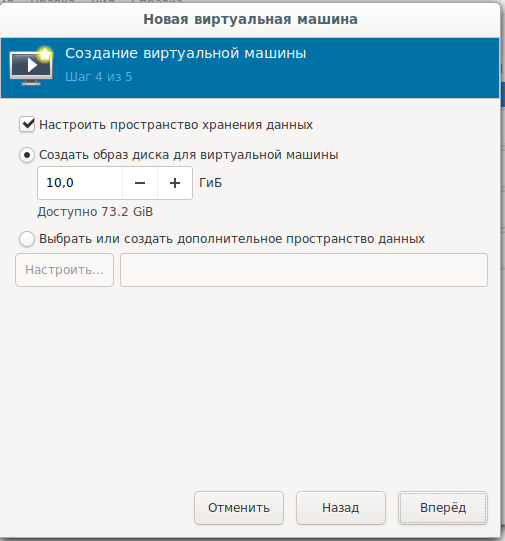
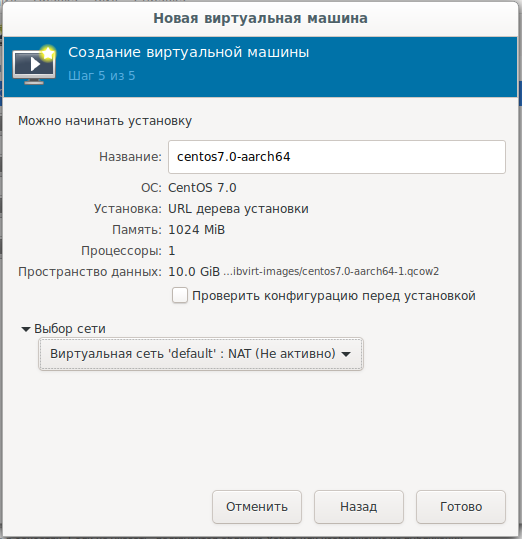
設定します:最終設定、ネットワークの選択:
ダウンロードしたい人のためにまたはオフラインでインストールすると、ディスクイメージがあります
。arm64
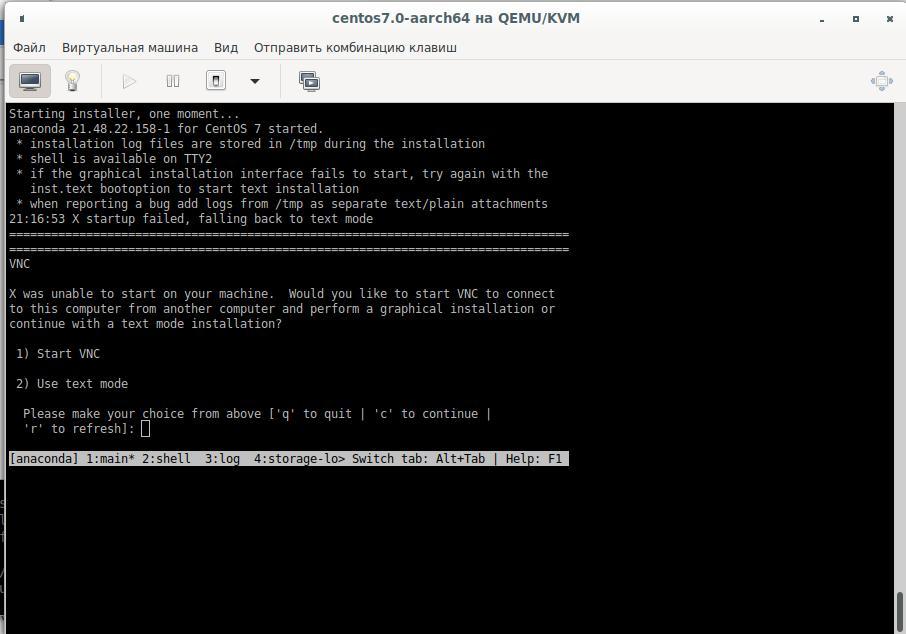
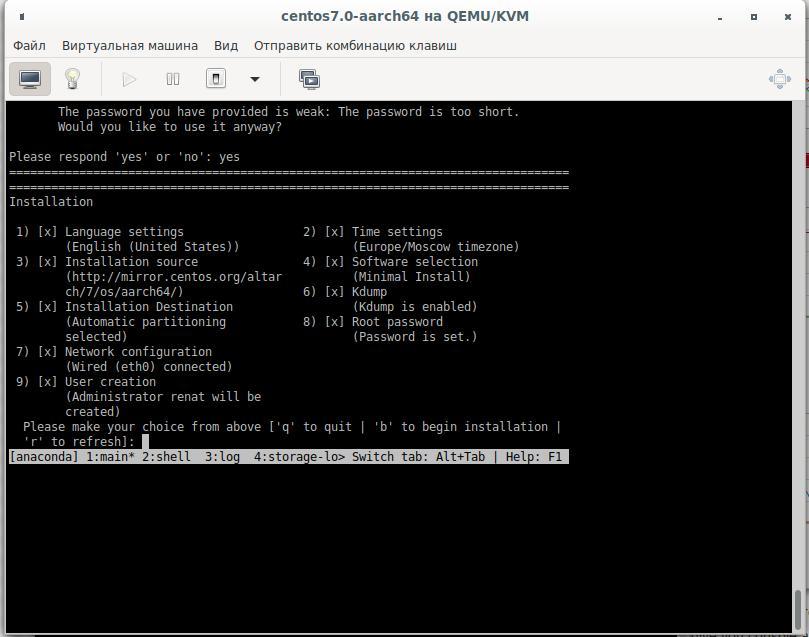
次に、システムをテキストモードでハードディスクにインストールし、必要な回答オプションを選択して、「はい」の回答で確認する必要があります。
組み立ては2番目の仮想ディスクで行われます。このためには25〜30Gbのディスクが必要です。仮想マシンをシャットダウンして接続し、再起動することで、新しいハードディスクを作成します。ハードドライブを壊してフォーマットしましょう:
cfdisk /dev/sdb
mkfs.ext4 /dev/sdb1 -L Qt_Rebuild
mount /dev/sdb1 /30
ファイルシステムがXFSではないのはなぜですか
XFS, Raspberry, .. XFS.
インストール後、仮想マシンに接続し、必要なパッケージをインストールします。
yum install centos-release-scl
yum install devtoolset-9-gcc.aarch64
yum install git
export PATH=/opt/rh/devtoolset-9/root/bin/:$PATH
echo clone from git
cd /30
git clone --recursive --single-branch --branch 5.15 git://github.com/qt/qt5.git
cd qt5
構成:
./configure -skip qt3d -no-warnings-are-errors -release -recheck-all --prefix /Qt/5.15.0 -opensource -confirm-license -nomake examples -nomake tests -c++std c++17 -I /usr/include/xcb/ -L /usr/lib/x86_64-linux-gnu/ -xcb-xlib -xcb -feature-thread -feature-xkbcommon -qt-libpng -qt-libjpeg -qt-zlib -I /usr/include/xcb/ -L /usr/lib/x86_64-linux-gnu/ --recheck-all
...
You need perl in your PATH to make a build from GIT.
Cannot proceed.

#yum install perl
構成の起動を繰り返して、次の情報を取得します。
Creating qmake...
gmake: g++: Command not found
gmake: *** [main.o] Error 127
コンパイラをインストールして、再度構成します。
yum install devtoolset-9-gcc-c++.aarch64
...
ERROR: Feature 'xcb' was enabled, but the pre-condition 'features.thread && libs.xcb && tests.xcb_syslibs && features.xkbcommon-x11' failed.

ERROR: Feature 'xcb-xlib' was enabled, but the pre-condition 'features.xlib && libs.xcb_xlib' failed.

ERROR: Feature 'xkbcommon' was enabled, but the pre-condition 'libs.xkbcommon' failed.

ERROR: The OpenGL functionality tests failed!
You might need to modify the include and library search paths by editing QMAKE_INCDIR_OPENGL[_ES2],
QMAKE_LIBDIR_OPENGL[_ES2] and QMAKE_LIBS_OPENGL[_ES2] in the mkspec for your platform.
必要なパッケージを検索して配信します。
yum install libxkbcommon-x11-devel
yum install xcb-util-renderutil-devel
yum install libxcb libxcb-devel libXrender libXrender-devel xcb-util-wm xcb-util-wm-devel xcb-util xcb-util-devel xcb-util-image xcb-util-image-devel xcb-util-keysyms xcb-util-keysyms-devel
構成しましたが、すでに1つのエラーが発生しています。
ERROR: Feature 'xcb-xlib' was enabled, but the pre-condition 'features.xlib && libs.xcb_xlib' failed.さらにパッケージを追加し、構成ログを確認します。
 yum install libxcb libxcb-devel xcb-util xcb-util-devel mesa-libGL-devel libxkbcommon-devel
...
Checking for XCB ICCCM >= 0.3.9... yes
Checking for XCB SHM... yes
Checking for XCB Image >= 0.3.9... yes
Checking for XCB Keysyms >= 0.3.9... yes
Checking for XCB RandR... yes
Checking for XCB XRender... yes
Checking for XCB Renderutil >= 0.3.9... yes
Checking for XCB Shape... yes
Checking for XCB Sync... yes
Checking for XCB Xfixes... yes
Checking for XCB Xinerama... yes
Checking for XCB XKB... yes
Checking for XCB (extensions)... yes
Checking for xkbcommon >= 0.5.0... yes
Checking for xkbcommon-x11... yes
…
Checking for XCB Xlib... yes
Checking for XCB GLX... yes
...
Qt is now configured for building. Just run 'gmake'.
Once everything is built, you must run 'gmake install'.
Qt will be installed into '/Qt/5.15.0'.

Prior to reconfiguration, make sure you remove any leftovers from
the previous build.
さて、すべての準備ができていますが、私たちに役立つかもしれないオプションをチェックする必要があります:
  OpenGL:
    Desktop OpenGL ....................... yes
    OpenGL ES 2.0 ........................ no
    OpenGL ES 3.0 ........................ no
    OpenGL ES 3.1 ........................ no
    OpenGL ES 3.2 ........................ no

  OpenSSL ................................ no
    Qt directly linked to OpenSSL ........ no
  OpenSSL 1.1 ............................ no
それでも、おそらくアプリケーションのネットワーク相互作用が必要です。httpを介してのみ機能するわけではありません。
yum install openssl-devel

Dependencies Resolved

================================================================================
 Package                   Arch          Version               Repository  Size
================================================================================
Installing:
 openssl-devel             aarch64       1:1.0.2k-19.el7       base       1.5 M
Installing for dependencies:
 keyutils-libs-devel       aarch64       1.5.8-3.el7           base        37 k
 krb5-devel                aarch64       1.15.1-46.el7         base       272 k
 libcom_err-devel          aarch64       1.42.9-17.el7         base        31 k
 libkadm5                  aarch64       1.15.1-46.el7         base       175 k
 libselinux-devel          aarch64       2.5-15.el7            base       186 k
 libsepol-devel            aarch64       2.5-10.el7            base        76 k
 libverto-devel            aarch64       0.2.5-4.el7           base        11 k
 pcre-devel                aarch64       8.32-17.el7           base       479 k
 zlib-devel                aarch64       1.2.7-18.el7          base        49 k

Transaction Summary
================================================================================
Install  1 Package (+9 Dependent packages)

Total download size: 2.8 M
Installed size: 6.4 M
Is this ok [y/d/N]:
バージョン1.0.2k、これはQtが要求するものよりも少ない(OpenSSLの最小サポートバージョンを1.1に増やしました。)
OpenSSLをビルドしてから、ソースからQtをビルドする必要があります。
wget https://www.openssl.org/source/openssl-1.1.1g.tar.gz
-bash: wget: command not found
cd /
curl https://www.openssl.org/source/openssl-1.1.1g.tar.gz -o openssl-1.1.1.g.tar.gz
tar -xvf openssl-1.1.1.g.tar.gz
cd /openssl-1.1.1g
perl Configure
echo   ,   ARM:
perl Configure linux-aarch64
Configuring OpenSSL version 1.1.1g (0x1010107fL) for linux-aarch64
Using os-specific seed configuration
Creating configdata.pm
Creating Makefile

**********************************************************************
***                                                                ***
***   OpenSSL has been successfully configured                     ***
***                                                                ***
***   If you encounter a problem while building, please open an    ***
***   issue on GitHub <https://github.com/openssl/openssl/issues>  ***
***   and include the output from the following command:           ***
***                                                                ***
***       perl configdata.pm --dump                                ***
***                                                                ***
***   (If you are new to OpenSSL, you might want to consult the    ***
***   'Troubleshooting' section in the INSTALL file first)         ***
***                                                                ***
**********************************************************************
make && make install次に、Qtを再度構成し、仮想マシン設定で指定されているプロセッサーの数(4つのプロセッサーでVMを作成する場合)に応じて、makeまたはmake-j4コマンドを使用してビルドを開始します。
アプリケーションビルドがクラッシュする:
make[3]: Entering directory `/30/qt5/qtsvg/src/svg'
g++ -c -include .pch/Qt5Svg -pipe -O2 -std=c++1z -fvisibility=hidden -fvisibility-inlines-hidden -fno-exceptions -Wall -Wextra -Wvla -Wdate-time -Wshift-overflow=2 -Wduplicated-cond -Wno-stringop-overflow -Wno-format-overflow -D_REENTRANT -fPIC -DQT_NO_LINKED_LIST -DQT_NO_FOREACH -DQT_NO_USING_NAMESPACE -DQT_NO_NARROWING_CONVERSIONS_IN_CONNECT -DQT_BUILD_SVG_LIB -DQT_BUILDING_QT -DQT_NO_CAST_TO_ASCII -DQT_ASCII_CAST_WARNINGS -DQT_MOC_COMPAT -DQT_USE_QSTRINGBUILDER -DQT_DEPRECATED_WARNINGS -DQT_DISABLE_DEPRECATED_BEFORE=0x050000 -DQT_DEPRECATED_WARNINGS_SINCE=0x060000 -DQT_NO_EXCEPTIONS -D_LARGEFILE64_SOURCE -D_LARGEFILE_SOURCE -DQT_NO_DEBUG -DQT_WIDGETS_LIB -DQT_GUI_LIB -DQT_CORE_LIB -DQT_ZLIB_LIB -I. -I../../include -I../../include/QtSvg -I../../include/QtSvg/5.15.0 -I../../include/QtSvg/5.15.0/QtSvg -I/30/qt5/qtbase/include/QtWidgets/5.15.0 -I/30/qt5/qtbase/include/QtWidgets/5.15.0/QtWidgets -I/30/qt5/qtbase/include/QtGui/5.15.0 -I/30/qt5/qtbase/include/QtGui/5.15.0/QtGui -I/30/qt5/qtbase/include/QtCore/5.15.0 -I/30/qt5/qtbase/include/QtCore/5.15.0/QtCore -I/30/qt5/qtbase/include -I/30/qt5/qtbase/include/QtWidgets -I/30/qt5/qtbase/include/QtGui -I/30/qt5/qtbase/include/QtCore -I/30/qt5/qtbase/include/QtZlib -I/30/qt5/qtbase/include/QtZlib/5.15.0 -I/30/qt5/qtbase/include/QtZlib/5.15.0/QtZlib -I.moc -I/usr/include/libdrm -I/usr/include/xcb -I/usr/include/xcb -I/30/qt5/qtbase/mkspecs/linux-g++ -o .obj/qsvgfont.o qsvgfont.cpp
In file included from /30/qt5/qtbase/include/QtGui/qopenglversionfunctions.h:1,
                 from /30/qt5/qtbase/include/QtGui/../../src/gui/kernel/qopenglcontext.h:61,
                 from /30/qt5/qtbase/include/QtGui/qopenglcontext.h:1,
                 from /30/qt5/qtbase/include/QtGui/QtGui:49,
                 from ../../include/QtSvg/QtSvgDepends:4:
/30/qt5/qtbase/include/QtGui/../../src/gui/opengl/qopenglversionfunctions.h: In instantiation of ‘class QVector<double>’:
qsvgstyle_p.h:696:20:   required from here
/30/qt5/qtbase/include/QtGui/../../src/gui/opengl/qopenglversionfunctions.h:201:5: internal compiler error: in tsubst_function_decl, at cp/pt.c:12967
  201 |     QAbstractOpenGLFunctionsPrivate()
      |     ^~~~~~~~~~~~~~~~~~~~~~~~~~~~~~~
Please submit a full bug report,
with preprocessed source if appropriate.
See <http://bugzilla.redhat.com/bugzilla> for instructions.
make[3]: *** [.obj/qsvgfont.o] Error 1
make[3]: Leaving directory `/30/qt5/qtsvg/src/svg'
make[2]: *** [sub-svg-make_first-ordered] Error 2
make[2]: Leaving directory `/30/qt5/qtsvg/src'
make[1]: *** [sub-src-make_first] Error 2
make[1]: Leaving directory `/30/qt5/qtsvg'
make: *** [module-qtsvg-make_first] Error 2
パッケージの追加バージョンをインストールし、試行3でそれを取得します。
-
yum install harfbuzz-devel yum install at-spi2-atk-devel at-spi2-core-devel dbus-devel glib2-devel graphite2-devel keyutils-libs-devel krb5-devel libcom_err-devel libicu-devel libselinux-devel libsepol-devel libverto-devel pcre-devel zlib-devel-
yum install mesa-libGLw-devel
構成と組み立てが進行中です。QtCreatorで(アセンブリqmakeを使用して)テストアプリケーションを作成し、ソースを仮想マシンにコピーして、アプリケーションをビルドします。Binarは準備ができており、Raspberryでテストする必要があります。
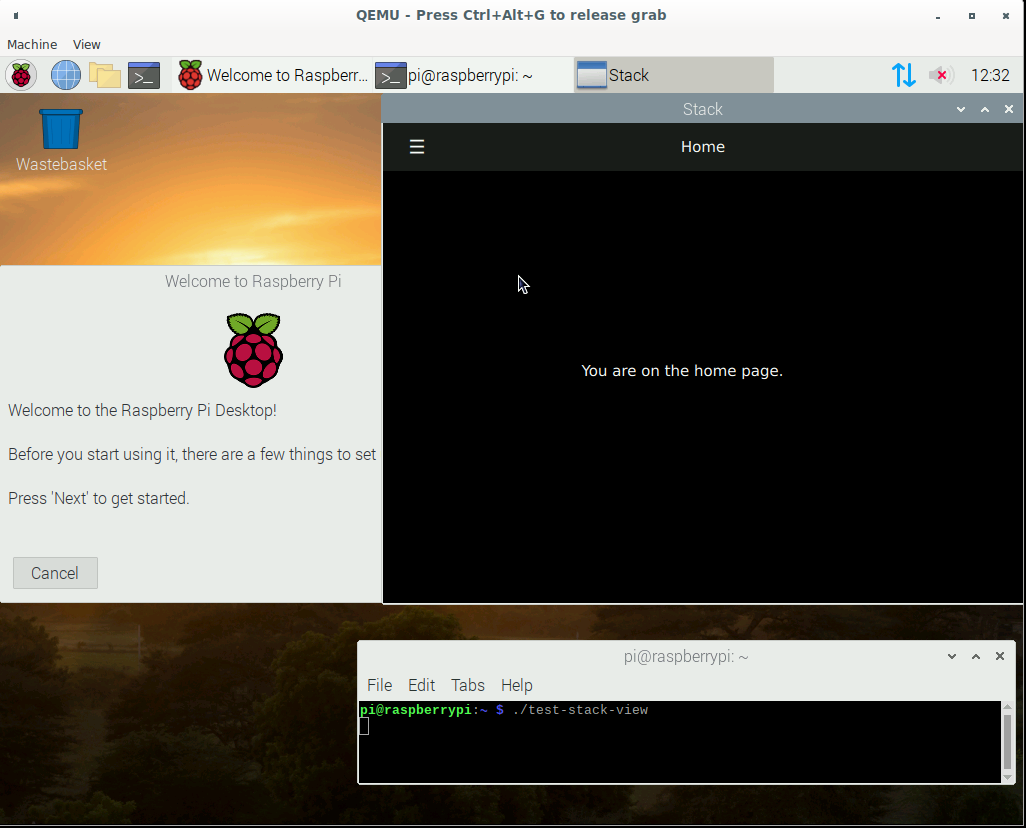
2.Raspberryエミュレーターで実行します
この記事のフレームワーク内でARMプロセッサをエミュレートしているため、仮想マシンでも実行することを意味します。リンク1 リンク2 リンク3:エミュレータのカーネルであるRaspberry Webサイトから公式イメージを
ダウンロードして実行します(このようなスタートアップファイルを作成しました)。
echo create disk for Qt sources and Projects
qemu-img create -f qcow2 qt-rebuild-25gb-disk.qcow2 25G
cat start-emul.sh
#!/bin/bash

path_img=/home/user/Project/qemu
path_kernel=/home/user/qemu/qemu-rpi-kernel
sudo qemu-system-arm -kernel $path_kernel/kernel-qemu-4.19.50-buster -dtb $path_kernel/versatile-pb-buster.dtb \
-cpu arm1176 -m 256 -M versatilepb -append "root=/dev/sda2 rw" -net nic -net user,hostfwd=tcp::5022-:22 \
-net tap,ifname=vnet0,script=no,downscript=no -hdb $path_img/qt-rebuild-25gb-disk.qcow2 -no-reboot -hda $path_img/2020-05-27-raspios-buster-armhf.img
アプリケーションを起動しようとしています:それは
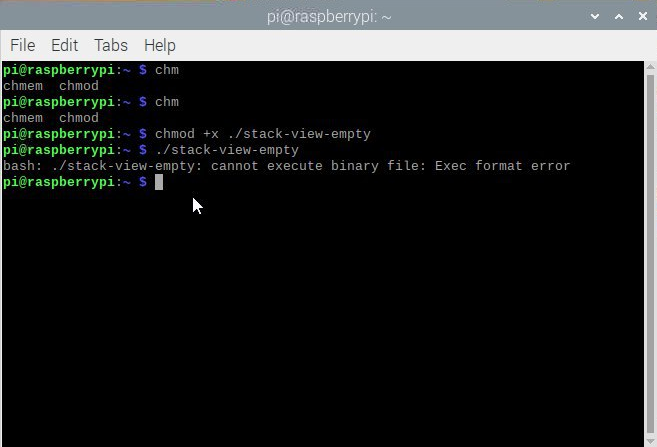
なぜですか?プロセッサ
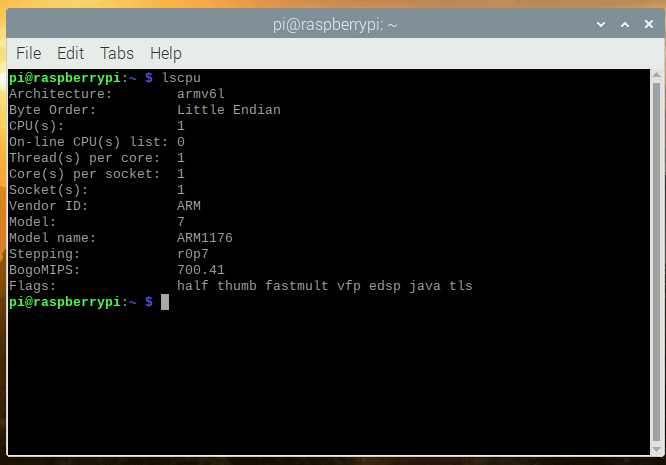
を確認します。CentOSの構成ファイルを確認します。
[root@aaarch-qemu qt5]# cat config.summary |grep CPU
Build type: linux-g++ (arm64, CPU features: cx16 neon)
さて、64ビットのarmv8アプリケーションをコンパイルし、armv6プロセッサを搭載した32ビットのエミュレータで実行しようとしています。新しい64ビットプロセッサを搭載した実際のデバイスの所有者が、実際のデバイスでアプリケーションを実行できたかどうかに関係なく、コメントで登録を解除できることを願っています。
さて、それは問題ではありません、私たちは今ラズベリーエミュレーターで集めることができますか? df -hコマンドを呼び出した後、空きディスク領域がほとんどないことがわかりました。最も簡単な方法は、イメージファイルをコピーして拡大し、2つのファイルシステムで仮想マシンを起動し、2番目のマシンのルートパーティションを拡大してから、2番目のイメージを使用することでした。行く:
qemu-img convert 2020-05-27-raspios-buster-armhf.img 2020-05-27-raspios-buster-armhf-10gb.qcow2 -O qcow2 -p
qemu-img resize 2020-05-27-raspios-buster-armhf-10gb.qcow2 +6G
起動スクリプトに別のハードドライブを追加します。
-hdc2020-05-27-raspios-buster-armhf-10gb.qcow2起動
後、このハードドライブを編集します。sudocfdisk / dev / sdc:
サイズ変更:

書き込みと確認はい:確認することを
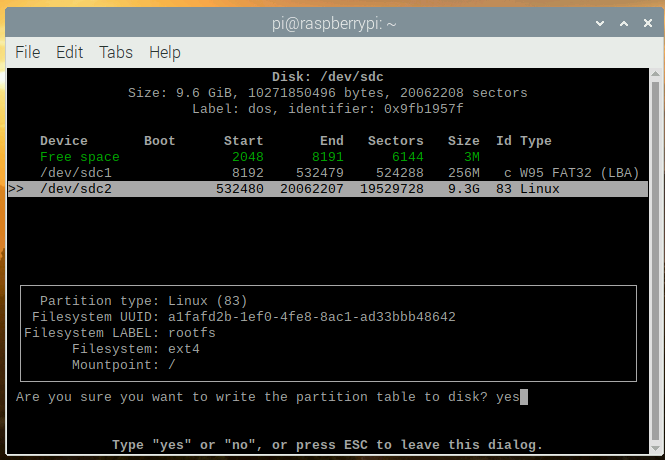
忘れないでください。ディスクが必要なサイズになったこと:
sudo mkdir /test
sudo mount /dev/sdc2 /test
df -h
Filesystem      Size  Used Avail Use% Mounted on
/dev/root       3.2G  2.8G  257M  92% /
devtmpfs        124M     0  124M   0% /dev
tmpfs           124M     0  124M   0% /dev/shm
tmpfs           124M  2.0M  122M   2% /run
tmpfs           5.0M     0  5.0M   0% /run/lock
tmpfs           124M     0  124M   0% /sys/fs/cgroup
/dev/sdc1       253M   51M  202M  21% /boot
tmpfs            25M     0   25M   0% /run/user/1000
/dev/sdc2       3.2G  2.7G  358M  89% /test
/ testフォルダーに接続されているsdcディスクのサイズが追加されていないので、修正しましょう。
sudo umount /test
sudo fsck -f /dev/sdc2
sudo resize2fs /dev/sdc2
resize2fs 1.44.5 (15-Dec-2018)
Please run 'e2fsck -f /dev/sdc2' first.

pi@raspberrypi:~ $ e2fsck -f /dev/sdc2
e2fsck 1.44.5 (15-Dec-2018)
e2fsck: Permission denied while trying to open /dev/sdc2
You must have r/w access to the filesystem or be root
pi@raspberrypi:~ $ sudo e2fsck -f /dev/sdc2
e2fsck 1.44.5 (15-Dec-2018)
Pass 1: Checking inodes, blocks, and sizes
Pass 2: Checking directory structure
Pass 3: Checking directory connectivity
Pass 4: Checking reference counts
Pass 5: Checking group summary information
rootfs: 106640/217296 files (0.3% non-contiguous), 729343/868352 blocks
pi@raspberrypi:~ $ sudo resize2fs /dev/sdc2
resize2fs 1.44.5 (15-Dec-2018)
Resizing the filesystem on /dev/sdc2 to 2441216 (4k) blocks.
The filesystem on /dev/sdc2 is now 2441216 (4k) blocks long.

sudo mount /dev/sdc2 /test
pi@raspberrypi:~ $ df -h
Filesystem      Size  Used Avail Use% Mounted on
/dev/root       3.2G  2.8G  259M  92% /
devtmpfs        124M     0  124M   0% /dev
tmpfs           124M     0  124M   0% /dev/shm
tmpfs           124M  2.0M  122M   2% /run
tmpfs           5.0M     0  5.0M   0% /run/lock
tmpfs           124M     0  124M   0% /sys/fs/cgroup
/dev/sdc1       253M   51M  202M  21% /boot
tmpfs            25M     0   25M   0% /run/user/1000
/dev/sdc2       9.2G  2.7G  6.0G  31% /test
仮想マシンをオフにします。start-emul.shファイルを再度編集し、hdaハードドライブを新しいものと交換し、3番目のハードドライブ-hdcへのリンクを削除します。これで、より多くのスペースを持つファイルシステムができました。
これで、最初の仮想マシンからのQtソースにハードディスクを接続できます。
アドバイス:一時ファイルから「ソースをクリーンアップ」することをお勧めします。構成する前にリポジトリのクローンを作成したときのgitの状態を返します。
cd /30/qt5
git reset --hard
git submodule foreach --recursive 'git reset HEAD . || :'
git submodule foreach --recursive 'git checkout -- . || :'
git clean -d -f -f -x
git submodule foreach --recursive git clean -d -f -f -x
したがって、Debianでは次のものが必要です。
sudo apt install gcc-arm-none-eabi
sudo apt install wget build-essential \
 ^libxcb.*-dev \
libopenal-dev \
flite1-dev   libspeechd-dev \
libudev-dev \
libinput-dev \
libxkbcommon-x11-dev curl libssl-dev time -y

sudo apt install libx11-dev -y \
    libfontconfig1-dev \
    libfreetype6-dev \
    libx11-dev \
    libxext-dev \
    libxfixes-dev \
    libxi-dev \
    libxrender-dev \
    libxcb1-dev \
    libx11-xcb-dev \
    libxcb-glx0-dev \
    libxkbcommon-x11-dev \
    mesa-common-dev \
libgl1-mesa-dev
構成:
cd /30/qt5
./configure -skip qt3d -no-warnings-are-errors -release -recheck-all -prefix /Qt/5.15.0 -opensource -confirm-license -nomake examples -nomake tests -c++std c++17 -I /usr/include/xcb/ -L /usr/lib/x86_64-linux-gnu/ -xcb-xlib -xcb -feature-thread -feature-xkbcommon -qt-libpng -qt-libjpeg -qt-zlib -I /usr/include/xcb/ -L /usr/lib/x86_64-linux-gnu/ --recheck-all -skip wayland -skip qtwebengine -skip qtwayland
また、エラーが発生します:
ERROR: Feature 'xcb-xlib' was enabled, but the pre-condition 'features.xlib && libs.xcb_xlib' failed.

ERROR: The OpenGL functionality tests failed!
You might need to modify the include and library search paths by editing QMAKE_INCDIR_OPENGL[_ES2],
QMAKE_LIBDIR_OPENGL[_ES2] and QMAKE_LIBS_OPENGL[_ES2] in the mkspec for your platform.評議会。QEMUグラフィカルウィンドウでこれらのコマンドを入力しましたか?忘れないでください。sshがあります。sshサーバー仮想マシンで起動する必要があります。sudosystemctlstartssh && sudo systemctl enable sshを実行し、ローカルコンピューターから仮想マシンに接続します。sshpi @ localhost -p 5022 user pi passwordraspberry
別の開発パッケージをインストールします。
sudo apt install wget build-essential  ^libxcb.*-dev libopenal-dev flite1-dev   libspeechd-dev libudev-dev libinput-dev libxkbcommon-x11-dev curl libssl-dev time -y
sudo apt install libasound2-dev libavcodec-dev libclipper-dev libdbus-1-dev libdrm-dev libegl-dev libgles2-mesa-dev
sudo  apt install libx11-dev libfontconfig1-dev libfreetype6-dev libx11-dev libxext-dev libxfixes-dev libxi-dev libxrender-dev libxcb1-dev libx11-xcb-dev libxcb-glx0-dev libxkbcommon-x11-dev mesa-common-dev libgl1-mesa-dev
構成して、構成結果の出力を取得します。
time ./configure -skip qt3d -no-warnings-are-errors -release -recheck-all -prefix /Qt/5.15.0 -opensource -confirm-license -nomake examples -nomake tests -c++std c++17 -I /usr/include/xcb/ -L /usr/lib/x86_64-linux-gnu/ -xcb-xlib -xcb -feature-thread -feature-xkbcommon -qt-libpng -qt-libjpeg -qt-zlib -I /usr/include/xcb/ -L /usr/lib/x86_64-linux-gnu/ --recheck-all -skip wayland -skip qtwebengine -skip qtwayland
............Done.
Info: creating super cache file /30/qt5/.qmake.super
Info: creating cache file /30/qt5/.qmake.cache
Info: creating stash file /30/qt5/.qmake.stash
This is the Qt Open Source Edition.
You have already accepted the terms of the Open Source license.
Running configuration tests…
…
Note: Option 'cache_use' with value 'none' was specified twice
Note: Also available for Linux: linux-clang linux-icc
Note: Disabling X11 Accessibility Bridge: D-Bus or AT-SPI is missing.
WARNING: QDoc will not be compiled, probably because libclang could not be located. This means that you cannot build the Qt documentation.
Either ensure that llvm-config is in your PATH environment variable, or set LLVM_INSTALL_DIR to the location of your llvm installation.
On Linux systems, you may be able to install libclang by installing the libclang-dev or libclang-devel package, depending on your distribution.
On macOS, you can use Homebrew's llvm package.
On Windows, you must set LLVM_INSTALL_DIR to the installation path.
Qt is now configured for building. Just run 'make'.
Once everything is built, you must run 'make install'.
Qt will be installed into '/Qt/5.15.0'.
Prior to reconfiguration, make sure you remove any leftovers from
the previous build.
real 91m49.471s
user 78m43.608s
sys 7m22.934s
構成の結果に関する情報を出力
するこれまで読んだことがあり、まだ試してみたいという熱意を持っている人は、実行したプロセッサの説明とともに、構成ステップの速度の
これで、コンピュータの1つのコアがQtをビルドし、場合によってはビルドするのに非常に長い時間がかかります。おそらく、ビルド中に十分なメモリがないか、エラーが発生したというエラーが表示されます。これを行うには、1〜1.5Gbのスワップファイルを作成して接続することをお勧めします。
sudo dd if=/dev/zero of=/30/swap1500 bs=256M count=6 status=progress
dd: memory exhausted by input buffer of size 268435456 bytes (256 MiB)

sudo dd if=/dev/zero of=/30/swap1500 bs=128M count=12 status=progress
1610612736 bytes (1.6 GB, 1.5 GiB) copied, 82 s, 19.6 MB/s
12+0 records in
12+0 records out
1610612736 bytes (1.6 GB, 1.5 GiB) copied, 82.223 s, 19.6 MB/s

sudo chmod 600 /30/swap1500
sudo mkswap /30/swap1500
Setting up swapspace version 1, size = 1.5 GiB (1610608640 bytes)
no label, UUID=af79f154-6904-4b6d-8c1d-61890bdda556

sudo swapon /30/swap1500

free
              total        used        free      shared  buff/cache   available
Mem:         252228       24652      142532         536       85044      179184
Swap:       1675256       69888     1605368
収集してインストールします:
make && sudo make install追加のモジュールが必要な場合は、たとえばqtquickcontrols2のように、いつでも追加できます。
export PATH=/Qt/5.15.0/bin:$PATH
cd /30/qt5/qtuickcontrols2/
qmake
make && sudo make install
その後、アプリケーションを収集して起動します。
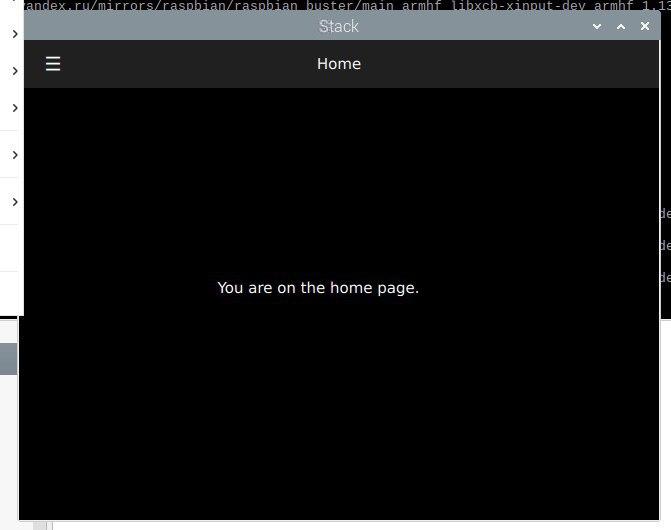
結論
QEMUエミュレーターを使用して、x86デバイス上でARM用のアプリケーションを構築することができます。この記事は1週間で書くと思いましたが、各段階(システムのインストール、システムの更新、開発パッケージのインストール、およびgithubからのQtソースコードの取得)に非常に長い時間がかかるため、プロセスはほぼ3週間続きました。たとえば、Raspberryエミュレーターで静的バージョンのQtをビルドするには、1426分かかりました。
速いですか?はい、それはクロスビルドと呼ばれます。これを行うには、sysrootを構成し、ARMコンパイラーをインストールし、ホストシステムでQtを構成およびビルドします。次に、このバージョンのQtを使用するようにQtCreatorを構成し、x86コンピューター/ラップトップでアプリケーションをビルドし、組み込みLinuxで動作するバージョンを取得します。リンク1 リンク2なぜなら これはすでにこの記事の範囲を超えています。時間やインスピレーションがあればこれについて書くかもしれませんが、Qt5.15の最新バージョンでこれを行う方法を誰かが書くかもしれません。
繰り返しますが、誰かがARM Raspberryエミュレーターの第2章の手順を繰り返したい場合は、qmakeと構成段階の構築にかかる時間を記述して、コメントにプロセッサーを示すことができます。
清聴ありがとうございました。あなたの創造性で頑張ってください!