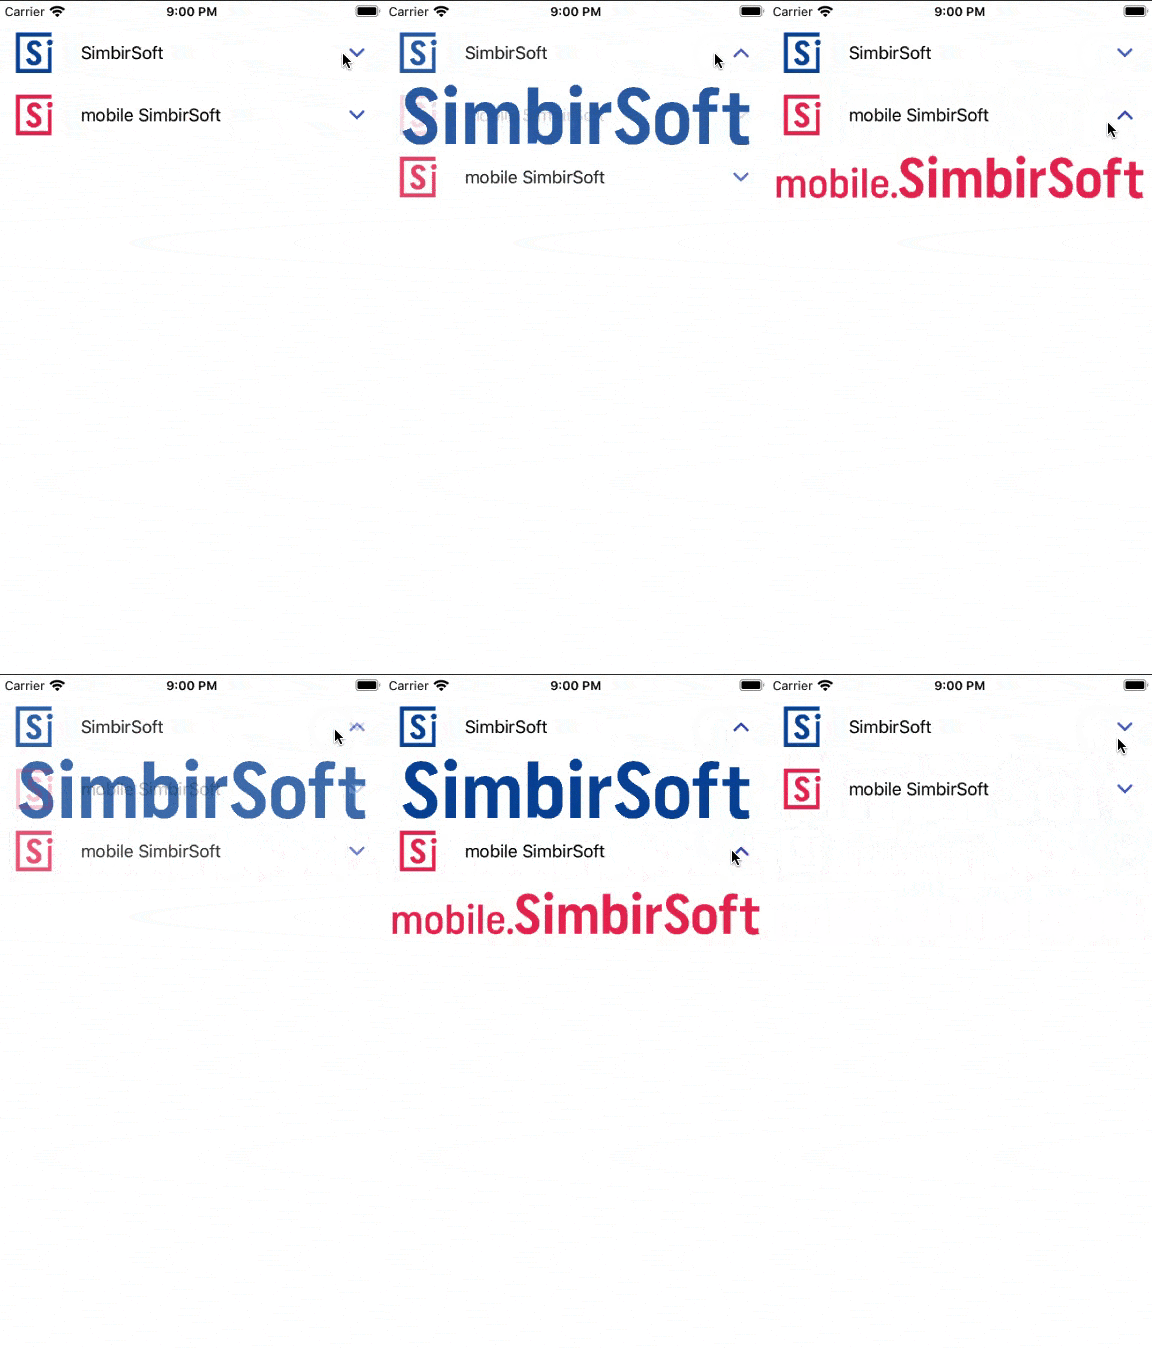
この記事では、IGListKitフレームワークについて検討し ます。上記の問題を解決するためにInstagram開発チームによって作成されました。これにより、いくつかのタイプのセルでコレクションを設定し、それらを数行で再利用できます。同時に、開発者はメインのViewControllerからフレームワークのロジックをカプセル化することができます。次に、動的コレクションの作成とイベントの処理の詳細について説明します。このレビューは、新しいツールを習得したい初心者と経験豊富な開発者の両方に役立ちます。

IGListKitの操作方法
IGListKitフレームワークの使用は、標準のUICollectionView実装とほぼ同じです。さらに、次のものがあります。
- データ・モデル;
- ViewController;
- UICollectionViewCellコレクションのセル。
さらに、ヘルパークラスがあります。
- SectionController-現在のセクションのセルの構成を担当します。
- SectionControllerModel-各セクションには独自のデータモデルがあります。
- UICollectionViewCellModel-セルごとに、独自のデータモデルもあります。
それらの使用についてさらに詳しく考えてみましょう。
データモデルの作成
まず、構造ではなくクラスであるモデルを作成する必要があります。この機能は、IGListKitがObjective-Cで記述されているためです。
final class Company {

    let id: String
    let title: String
    let logo: UIImage
    let logoSymbol: UIImage
    var isExpanded: Bool = false

    init(id: String, title: String, logo: UIImage, logoSymbol: UIImage) {
        self.id = id
        self.title = title
        self.logo = logo
        self.logoSymbol = logoSymbol
    }
}
次に、ListDiffableプロトコルを使用してモデルを拡張しましょう 。
extension Company: ListDiffable {
    func diffIdentifier() -> NSObjectProtocol {
        return id as NSObjectProtocol
    }

    func isEqual(toDiffableObject object: ListDiffable?) -> Bool {
        guard let object = object as? Company else { return false }
        return id == object.id
    }
}
ListDiffableを使用すると、オブジェクトを一意に識別して比較し、UICollectionView内のデータをエラーなしで自動的に更新できます。
このプロトコルでは、次の2つの方法を実装する必要があります。
func diffIdentifier() -> NSObjectProtocol
このメソッドは、比較に使用されるモデルの一意の識別子を返します。
func isEqual(toDiffableObject object: ListDiffable?) -> Bool
この方法は、2つのモデルを相互に比較するために使用されます。
IGListKitを使用する場合、モデルを使用して各セルとSectionControllerを作成および操作するのが一般的です。これらのモデルは、上記のルールに従って作成されます。例はリポジトリで表示でき ます。
セルとデータモデルの同期
セルモデルを作成した後、データをセル自体の入力と同期させる必要があります。すでにExpandingCellがレイアウトされているとしましょう 。IGListKitを操作する機能を追加し、ListBindableプロトコルを操作するように拡張してみましょう 。
extension ExpandingCell: ListBindable {
    func bindViewModel(_ viewModel: Any) {
        guard let model = viewModel as? ExpandingCellModel else { return }
        logoImageView.image = model.logo
        titleLable.text = model.title
        upDownImageView.image = model.isExpanded
            ? UIImage(named: "up")
            : UIImage(named: "down")
    }
}
このプロトコルには、func bindViewModel(_ viewModel:Any)メソッドの実装が必要 です。このメソッドは、セル内のデータを更新します。
セルのリストの作成-SectionController
データモデルとセルの準備ができたら、それらの使用とリストの作成を開始できます。SectionControllerクラスを作成しましょう。
final class InfoSectionController: ListBindingSectionController<ListDiffable> {

    weak var delegate: InfoSectionControllerDelegate?

    override init() {
        super.init()

        dataSource = self
    }
}
私たちのクラスはから継承します
ListBindingSectionController<ListDiffable>
これは、ListDiffableに準拠するすべてのモデルがSectionControllerで機能することを意味します。
また、SectionControllerプロトコルListBindingSectionControllerDataSourceを展開する必要があります 。
extension InfoSectionController: ListBindingSectionControllerDataSource {
    func sectionController(_ sectionController: ListBindingSectionController<ListDiffable>, viewModelsFor object: Any) -> [ListDiffable] {
        guard let sectionModel = object as? InfoSectionModel else {
            return []
        }

        var models = [ListDiffable]()

        for item in sectionModel.companies {
            models.append(
                ExpandingCellModel(
                    identifier: item.id,
                    isExpanded: item.isExpanded,
                    title: item.title,
                    logo: item.logoSymbol
                )
            )

            if item.isExpanded {
                models.append(
                    ImageCellModel(logo: item.logo)
                )
            }
        }

        return models
    }

    func sectionController(_ sectionController: ListBindingSectionController<ListDiffable>, cellForViewModel viewModel: Any, at index: Int) -> UICollectionViewCell & ListBindable {

        let cell = self.cell(for: viewModel, at: index)
        return cell
    }

    func sectionController(_ sectionController: ListBindingSectionController<ListDiffable>, sizeForViewModel viewModel: Any, at index: Int) -> CGSize {
        let width = collectionContext?.containerSize.width ?? 0
        var height: CGFloat
        switch viewModel {
        case is ExpandingCellModel:
            height = 60
        case is ImageCellModel:
            height = 70
        default:
            height = 0
        }

        return CGSize(width: width, height: height)
    }
}
プロトコルに準拠するために、次の3つの方法を実装します。
func sectionController(_ sectionController: ListBindingSectionController<ListDiffable>, viewModelsFor object: Any) -> [ListDiffable]
このメソッドは、UICollectionViewに表示される順序でモデルの配列を作成します。
func sectionController(_ sectionController: ListBindingSectionController<ListDiffable>, cellForViewModel viewModel: Any, at index: Int) -> UICollectionViewCell & ListBindable
このメソッドは、データモデルに従って目的のセルを返します。この例では、セルを接続するためのコードが個別に取り出されています。詳細については、リポジトリを参照してください 。
func sectionController(_ sectionController: ListBindingSectionController<ListDiffable>, sizeForViewModel viewModel: Any, at index: Int) -> CGSize
このメソッドは、各セルのサイズを返します。
ViewControllerの設定
ListAdapterとデータモデルを既存のViewControllerに接続し、それを埋めましょう。ListAdapterを使用すると、セルを使用してUICollectionViewを作成および更新できます。
class ViewController: UIViewController {

    var companies: [Company]

    private lazy var adapter = {
        ListAdapter(updater: ListAdapterUpdater(), viewController: self)
    }()

    required init?(coder: NSCoder) {
        self.companies = [
            Company(
                id: "ss",
                title: "SimbirSoft",
                logo: UIImage(named: "ss_text")!,
                logoSymbol: UIImage(named: "ss_symbol")!
            ),
            Company(
                id: "mobile-ss",
                title: "mobile SimbirSoft",
                logo: UIImage(named: "mobile_text")!,
                logoSymbol: UIImage(named: "mobile_symbol")!
            )
        ]

        super.init(coder: coder)
    }

    override func viewDidLoad() {
        super.viewDidLoad()

        configureCollectionView()
    }

    private func configureCollectionView() {
        adapter.collectionView = collectionView
        adapter.dataSource = self
    }
}
正しく機能するには、ViewControllerプロトコルListAdapterDataSourceを展開するためのアダプターが必要です 。
extension ViewController: ListAdapterDataSource {
    func objects(for listAdapter: ListAdapter) -> [ListDiffable] {
        return [
            InfoSectionModel(companies: companies)
        ]
    }

    func listAdapter(_ listAdapter: ListAdapter, sectionControllerFor object: Any) -> ListSectionController {
        let sectionController = InfoSectionController()
        return sectionController
    }

    func emptyView(for listAdapter: ListAdapter) -> UIView? {
        return nil
    }
}
プロトコルは3つの方法を実装します:
func objects(for listAdapter: ListAdapter) -> [ListDiffable]
このメソッドでは、SectionControllerの塗りつぶされたモデルの配列を返す必要があります。
func listAdapter(_ listAdapter: ListAdapter, sectionControllerFor object: Any) -> ListSectionController
このメソッドは、必要なSectionControllerを初期化します。
func emptyView(for listAdapter: ListAdapter) -> UIView?
セルが欠落しているときに表示されるビューを返します。
これで、プロジェクトを開始して作業を確認できます。UICollectionViewが生成されます。また、この記事では動的リストに触れたので、セルクリックの処理とネストされたセルの表示を追加します。
クリックイベントの処理
ListBindingSectionControllerSelectionDelegateプロトコルを使用してSectionControllerを拡張し、イニシャライザーにプロトコルコンプライアンスを追加する必要があります。
dataSource = self
extension InfoSectionController: ListBindingSectionControllerSelectionDelegate {
    func sectionController(_ sectionController: ListBindingSectionController<ListDiffable>, didSelectItemAt index: Int, viewModel: Any) {
        guard let cellModel = viewModel as? ExpandingCellModel
        else {
            return
        }

        delegate?.sectionControllerDidTapField(cellModel)
    }
}
セルがクリックされると、次のメソッドが呼び出されます。
func sectionController(_ sectionController: ListBindingSectionController<ListDiffable>, didSelectItemAt index: Int, viewModel: Any)
デリゲートを使用してデータモデルを更新しましょう。
protocol InfoSectionControllerDelegate: class {
    func sectionControllerDidTapField(_ field: ExpandingCellModel)
}
ViewControllerを拡張し、CompanyデータモデルのExpandingCellModelセルをクリックする と、isOpenedプロパティを 変更します 。次に、アダプターはUICollectionViewの状態を更新し、SectionControllerからの次のメソッドが新しく開いたセルを描画します。
func sectionController(_ sectionController: ListBindingSectionController<ListDiffable>, viewModelsFor object: Any) -> [ListDiffable]
extension ViewController: InfoSectionControllerDelegate {
    func sectionControllerDidTapField(_ field: ExpandingCellModel) {
        guard let company = companies.first(where: { $0.id == field.identifier })
        else { return }
        company.isExpanded.toggle()

        adapter.performUpdates(animated: true, completion: nil)
    }
}
まとめ
この記事では、IGListKitとイベント処理を使用して動的コレクションを作成する機能について説明しました。フレームワークの可能な機能の一部に触れただけですが、この部分でさえ、次の状況で開発者に役立つ可能性があります。
- 柔軟なリストをすばやく作成する。
- メインのViewControllerからコレクションロジックをカプセル化し、それをロードします。
- 複数の種類のセルでコレクションを設定し、それらを再利用します。
! .
gif

