Kivyと Flutterは、クロスプラットフォーム開発用の2つのオープンソースフレームワークです。
フラッター:
- Googleによって作成され、2017年にリリースされました。
- プログラミング言語としてDartを使用します。
- ネイティブコンポーネントを使用せず、独自のグラフィックエンジン内にインターフェイス全体を描画します。
Kivy:
- 2010年にKivyコミュニティによって作成されました。
- Pythonをプログラミング言語として使用し、UI要素をマークアップするための独自の宣言型言語(KV言語)を使用します。
- ネイティブコンポーネントを使用せず、OpenGL ES2.0およびSDL2を使用してインターフェイス全体を描画します。
最近、YouTubeのオープンスペースで、Flutterアプリケーションのビデオデモンストレーションに出くわしました。FlutterDesktopで構築されたFacebook DesktopRedesignです 。マテリアルデザインスタイルの素晴らしいデモアプリケーション!そして、私はKivyMDライブラリ(Kivyフレームワークのマテリアルコンポーネントのセット)の開発者の1人 なので、このような美しいインターフェイスを簡単に作成できるのではないかと思いました。幸い、作者はプロジェクトリポジトリへのリンクを残しました 。


上のスクリーンショットのどのアプリがFlutterを使用して書かれていると思いますか、そしてどのアプリがKivyを使用していますか?はっきりとした違いがないので、すぐに答えるのは難しいです。すぐに目を引くのは(下のスクリーンショット)、Kivyにはまだ通常のアンチエイリアシングがないことだけです。そして、これは悲しいことですが、重要ではありません。アプリケーションの個々の要素とそのソースコードをDart(Flutter)とPython / KV言語(Kivy)で比較します。
次に、コンポーネントが内部からどのように見えるかを見てみましょう...
StoryCard
Kivy
KVでのカードマークアップ-言語:

基本Pythonクラス:
from kivy.properties import StringProperty
from kivymd.uix.relativelayout import MDRelativeLayout
class StoryCard(MDRelativeLayout):
avatar = StringProperty()
story = StringProperty()
name = StringProperty()
def on_parent(self, *args):
if not self.avatar:
self.remove_widget(self.ids.avatar)
フラッター:
import 'package:flutter/material.dart';
import 'package:flutter/widgets.dart';
class Story extends StatefulWidget {
final String name;
final String avatar;
final String story;
const Story({
Key key,
this.name,
this.avatar,
this.story,
}) : super(key: key);
@override
_StoryState createState() => _StoryState();
}
class _StoryState extends State<Story> {
@override
Widget build(BuildContext context) {
return Container(
width: 150,
margin: const EdgeInsets.only(top: 30),
decoration: BoxDecoration(
borderRadius: BorderRadius.circular(30),
boxShadow: [
BoxShadow(
color: Colors.black.withOpacity(0.3),
blurRadius: 20,
offset: Offset(0, 10),
),
],
),
child: Stack(
overflow: Overflow.visible,
fit: StackFit.expand,
children: [
ClipRRect(
borderRadius: BorderRadius.circular(30),
child: Image.network(
widget.story,
fit: BoxFit.cover,
),
),
if (widget.avatar != null)
Positioned.fill(
top: -30,
child: Align(
alignment: Alignment.topCenter,
child: Container(
decoration: BoxDecoration(
borderRadius: BorderRadius.circular(30),
boxShadow: [
BoxShadow(
color: Colors.black.withOpacity(0.4),
blurRadius: 5,
offset: Offset(0, 3),
),
],
),
child: ClipRRect(
borderRadius: BorderRadius.circular(30),
child: Image.network(
widget.avatar,
fit: BoxFit.cover,
width: 60,
height: 60,
),
),
),
),
),
if (widget.avatar != null)
Positioned.fill(
child: Align(
alignment: Alignment.bottomCenter,
child: Row(
children: [
Expanded(
child: Container(
padding: const EdgeInsets.all(15),
decoration: BoxDecoration(
borderRadius: BorderRadius.circular(30),
gradient: LinearGradient(
begin: Alignment.topCenter,
end: Alignment.bottomCenter,
colors: [
Colors.transparent,
Colors.black,
],
),
),
child: widget.name != null ? Text(
widget.name,
textAlign: TextAlign.center,
maxLines: 1,
overflow: TextOverflow.ellipsis,
style: TextStyle(
color: Colors.white,
fontWeight: FontWeight.bold,
),
) : SizedBox(),
),
),
],
),
),
),
],
),
);
}
}
ご覧のとおり、PythonとKV-Languageのコードは2倍短いです。この記事で説明するPython / Kivyプロジェクトのソースコードの合計サイズは、31キロバイトです。この量の3キロバイトはPythonコードで、残りはKV-Languageです。Flutterのソースコードは54キロバイトです。ただし、驚くべきことは何もないようです-Pythonは世界で最も簡潔なプログラミング言語の1つです。
どちらが優れているかについては議論しません:DSL言語を使用してUIを記述するか、コードで直接記述します。ちなみに、Kivyではコードを使ってPythonウィジェットを作成することもできますが、これはあまり良い解決策ではありません。
TopBar
フラッター:

Kivy:

Python / Kivyでのアニメーションを含むこのバーの実装には、88行のコードしか必要ありませんでした。Dart / Flutterには、325行と9キロバイトのディスク容量があります。このウィジェットが何であるかを見てみましょう:
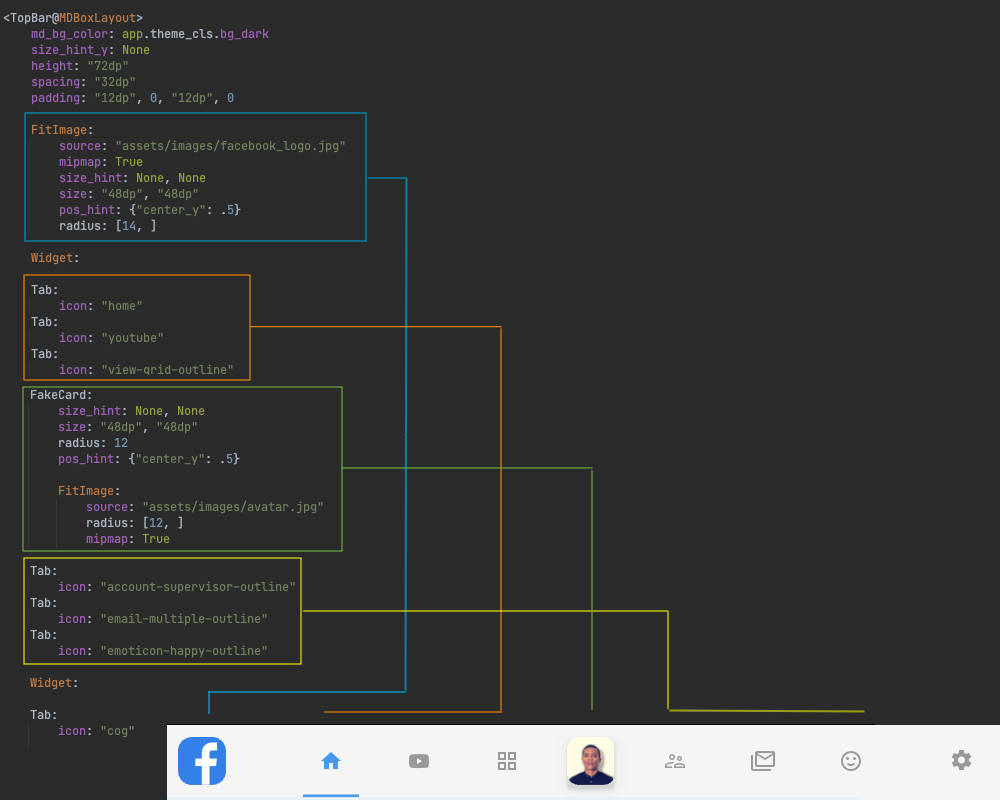
ロゴ、3つのタブ、アバター、3つのタブ、1つのタブ-設定ボタン。アニメーション化されたインジケーターを備えたタブの実装:

インジケーターのアニメーションとマウスカーソルのタイプの変更は、マークアップルールを使用して同じ名前のクラスのPythonファイルに実装されます。
from kivy.animation import Animation
from kivy.properties import StringProperty, BooleanProperty
from kivy.core.window import Window
from kivymd.uix.boxlayout import MDBoxLayout
from kivymd.uix.behaviors import FocusBehavior
class Tab(FocusBehavior, MDBoxLayout):
icon = StringProperty()
active = BooleanProperty(False)
def on_enter(self):
Window.set_system_cursor("hand")
def on_leave(self):
Window.set_system_cursor("arrow")
def on_active(self, instance, value):
Animation(
opacity=value,
width=self.width if value else 0,
d=0.25,
t="in_sine" if value else "out_sine",
).start(self.ids.separator)
ボタンの状態(アクティブ)に応じて、インジケーターの幅と不透明度を単純にアニメーション化します。ボタンの状態は、アプリケーション画面のメインクラスで設定されます。
class FacebookDesktop(ThemableBehavior, MDScreen):
def set_active_tab(self, instance_tab):
for widget in self.ids.tab_box.children:
if issubclass(widget.__class__, MDBoxLayout):
if widget == instance_tab:
widget.active = True
else:
widget.active = False
Kivy:
MaterialDesignで アニメーションの詳細をご覧ください。Kivyでのアニメーションの作成
Pythonでのモバイルアプリケーションの開発。Kivyでアニメーションを作成します。パート2
ダート/フラッターでの実装。
コードがたくさんあるので、私はすべてをネタバレの下に隠しました:
app_logo.dart
import 'package:flutter/material.dart';
import 'package:flutter/widgets.dart';
class AppLogo extends StatelessWidget {
@override
Widget build(BuildContext context) {
return Container(
decoration: BoxDecoration(
borderRadius: BorderRadius.circular(10),
boxShadow: [
BoxShadow(
color: Colors.blue.withOpacity(.6),
blurRadius: 5,
spreadRadius: 1,
),
],
),
child: ClipRRect(
borderRadius: BorderRadius.circular(10),
child: Image.asset(
'assets/images/facebook_logo.jpg',
width: 30,
height: 30,
),
),
);
}
}
avatar.dart
import 'package:flutter/material.dart';
import 'package:flutter/rendering.dart';
import 'package:flutter/widgets.dart';
class TopBarAvatar extends StatefulWidget {
@override
_TopBarAvatarState createState() => _TopBarAvatarState();
}
class _TopBarAvatarState extends State<TopBarAvatar>
with SingleTickerProviderStateMixin {
Animation<Color> _animation;
AnimationController _animationController;
@override
void initState() {
_animationController = AnimationController(
vsync: this,
duration: Duration(milliseconds: 150),
);
_animation = ColorTween(
begin: Colors.grey.withOpacity(.4),
end: Colors.blue.withOpacity(.6),
).animate(_animationController);
_animation.addListener(() {
setState(() {});
});
super.initState();
}
@override
Widget build(BuildContext context) {
return MouseRegion(
onHover: (event) {
setState(() {
_animationController.forward();
});
},
onExit: (event) {
setState(() {
_animationController.reverse();
});
},
cursor: SystemMouseCursors.click,
child: Padding(
padding: const EdgeInsets.symmetric(horizontal: 15),
child: Container(
decoration: BoxDecoration(
borderRadius: BorderRadius.circular(15),
boxShadow: [
BoxShadow(
color: _animation.value,
blurRadius: 10,
spreadRadius: 0,
),
],
),
child: ClipRRect(
borderRadius: BorderRadius.circular(15),
child: Image.asset(
'assets/images/avatar.jpg',
width: 50,
height: 50,
),
),
),
),
);
}
}
button.dart
import 'package:flutter/material.dart';
import 'package:flutter/rendering.dart';
import 'package:flutter/widgets.dart';
class TopBarButton extends StatefulWidget {
final IconData icon;
final bool isActive;
final Function onTap;
const TopBarButton({
Key key,
this.icon,
this.isActive = false,
this.onTap,
}) : super(key: key);
@override
_TopBarButtonState createState() => _TopBarButtonState();
}
class _TopBarButtonState extends State<TopBarButton>
with SingleTickerProviderStateMixin {
Animation<Color> _animation;
AnimationController _animationController;
@override
void initState() {
_animationController = AnimationController(
vsync: this,
duration: Duration(milliseconds: 150),
);
_animation = ColorTween(
begin: Colors.grey.withOpacity(.6),
end: Colors.blue.withOpacity(.6),
).animate(_animationController);
_animation.addListener(() {
setState(() {});
});
super.initState();
}
@override
void didUpdateWidget(TopBarButton oldWidget) {
if (widget.isActive) {
_animationController.forward();
} else {
_animationController.reverse();
}
super.didUpdateWidget(oldWidget);
}
@override
Widget build(BuildContext context) {
return GestureDetector(
onTap: widget.onTap,
child: MouseRegion(
cursor: SystemMouseCursors.click,
child: Container(
height: 80,
child: Stack(
alignment: Alignment.center,
children: [
Padding(
padding: const EdgeInsets.symmetric(horizontal: 30),
child: Icon(
widget.icon,
color: _animation.value,
),
),
Positioned(
bottom: -1,
child: Align(
alignment: Alignment.bottomCenter,
child: AnimatedContainer(
duration: Duration(milliseconds: 50),
curve: Curves.easeInOut,
decoration: BoxDecoration(
color: _animation.value,
borderRadius: BorderRadius.circular(5),
boxShadow: [
BoxShadow(
color: _animation.value,
blurRadius: 5,
offset: Offset(0, 2),
),
],
),
width: widget.isActive ? 50 : 0,
height: 4,
),
),
),
],
),
),
),
);
}
@override
void dispose() {
_animationController.dispose();
super.dispose();
}
}
widget.dart
import 'package:facebook_desktop/screens/home/components/top_bar/app_logo.dart';
import 'package:facebook_desktop/screens/home/components/top_bar/avatar.dart';
import 'package:facebook_desktop/screens/home/components/top_bar/button.dart';
import 'package:flutter/material.dart';
import 'package:flutter/widgets.dart';
import 'package:flutter_feather_icons/flutter_feather_icons.dart';
class TopBar extends StatefulWidget {
@override
_TopBarState createState() => _TopBarState();
}
class _TopBarState extends State<TopBar> {
int _selectedPage = 0;
@override
Widget build(BuildContext context) {
return Container(
color: Colors.white,
padding: const EdgeInsets.symmetric(
horizontal: 30,
),
child: Row(
children: [
Expanded(
flex: 1,
child: Align(
alignment: Alignment.centerLeft,
child: AppLogo(),
),
),
Expanded(
flex: 6,
child: Row(
mainAxisAlignment: MainAxisAlignment.center,
children: [
TopBarButton(
icon: FeatherIcons.home,
isActive: _selectedPage == 0,
onTap: () {
setState(() {
_selectedPage = 0;
});
},
),
TopBarButton(
icon: FeatherIcons.youtube,
isActive: _selectedPage == 1,
onTap: () {
setState(() {
_selectedPage = 1;
});
},
),
TopBarButton(
icon: FeatherIcons.grid,
isActive: _selectedPage == 2,
onTap: () {
setState(() {
_selectedPage = 2;
});
},
),
TopBarAvatar(),
TopBarButton(
icon: FeatherIcons.users,
isActive: _selectedPage == 3,
onTap: () {
setState(() {
_selectedPage = 3;
});
},
),
TopBarButton(
icon: FeatherIcons.zap,
isActive: _selectedPage == 4,
onTap: () {
setState(() {
_selectedPage = 4;
});
},
),
TopBarButton(
icon: FeatherIcons.smile,
isActive: _selectedPage == 5,
onTap: () {
setState(() {
_selectedPage = 5;
});
},
),
],
),
),
Expanded(
flex: 1,
child: Align(
alignment: Alignment.centerRight,
child: IconButton(
color: Colors.grey.withOpacity(.6),
icon: Icon(FeatherIcons.settings),
onPressed: () {},
),
),
),
],
),
);
}
}
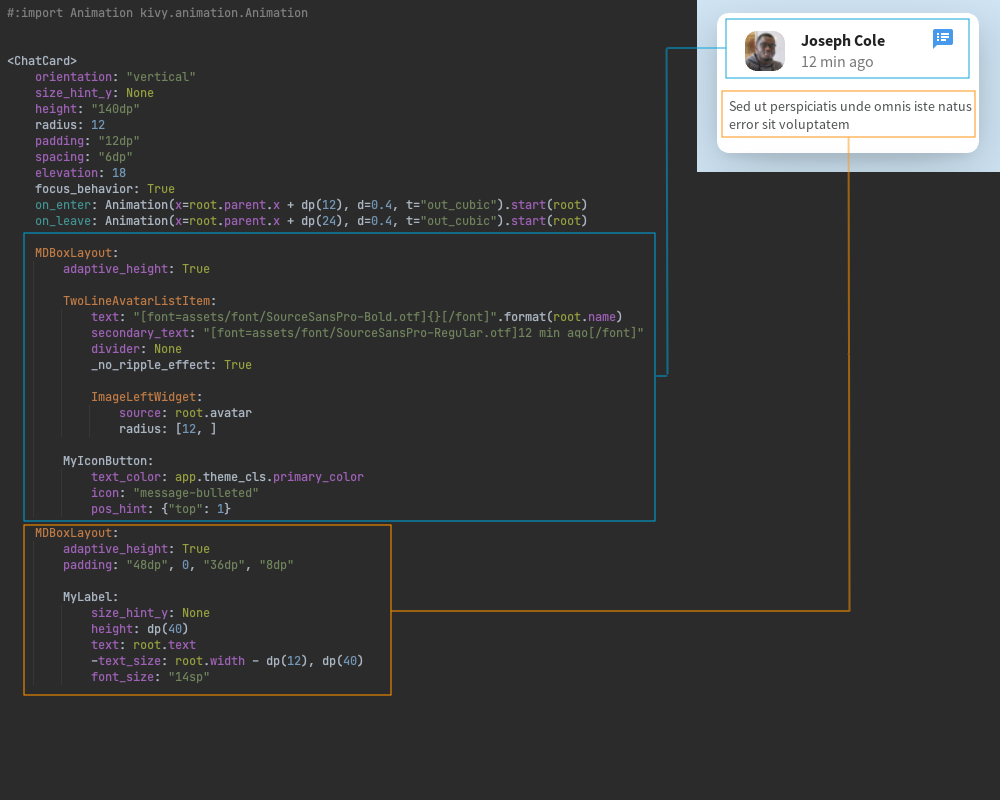
ChatCard(Kivy、Flutter)
|

|
カードのシフトのアニメーションは、フォーカスイベントと非フォーカスイベント(on_enter、on_leave)を受信すると、親ウィジェット(親)を基準にして発生します。
on_enter: Animation(x=root.parent.x + dp(12), d=0.4, t="out_cubic").start(root)
on_leave: Animation(x=root.parent.x + dp(24), d=0.4, t="out_cubic").start(root)
そして基本のPythonクラス:
from kivy.core.window import Window
from kivy.properties import StringProperty
from FacebookDesktop.components.cards.fake_card import FakeCard
class ChatCard(FakeCard):
avatar = StringProperty()
text = StringProperty()
name = StringProperty()
def on_enter(self):
Window.set_system_cursor("hand")
def on_leave(self):
Window.set_system_cursor("arrow")
Python / Kivyの実装-60行のコード、Dart / Flutterの実装-182行のコード。
chat_card.dart
import 'package:ezanimation/ezanimation.dart';
import 'package:facebook_desktop/components/user_tile.dart';
import 'package:flutter/material.dart';
import 'package:flutter/rendering.dart';
import 'package:flutter_feather_icons/flutter_feather_icons.dart';
class ChatCard extends StatefulWidget {
final String image;
final String name;
final String message;
final EdgeInsets padding;
const ChatCard({
Key key,
this.image,
this.name,
this.message,
this.padding,
}) : super(key: key);
@override
_ChatCardState createState() => _ChatCardState();
}
class _ChatCardState extends State<ChatCard> {
EzAnimation _animation;
@override
void initState() {
_animation = EzAnimation(
0.0,
-5.0,
Duration(milliseconds: 200),
curve: Curves.easeInOut,
context: context,
);
_animation.addListener(() {
setState(() {});
});
super.initState();
}
@override
Widget build(BuildContext context) {
return Transform.translate(
offset: Offset(_animation.value, 0),
child: MouseRegion(
cursor: SystemMouseCursors.click,
onEnter: (event) {
_animation.start();
},
onExit: (event) {
_animation.reverse();
},
child: Padding(
padding: widget.padding ?? const EdgeInsets.all(15),
child: Container(
width: 250,
padding: const EdgeInsets.all(15),
decoration: BoxDecoration(
color: Colors.white,
borderRadius: BorderRadius.circular(10),
boxShadow: [
BoxShadow(
color: Colors.black.withOpacity(.1),
blurRadius: 15,
offset: Offset(0, 8),
),
],
),
child: Column(
crossAxisAlignment: CrossAxisAlignment.start,
children: [
UserTile(
name: widget.name,
image: widget.image,
trailing: Icon(
FeatherIcons.messageSquare,
color: Colors.blue,
size: 14,
),
),
SizedBox(
height: 10,
),
Text(
widget.message,
style: TextStyle(color: Colors.grey, fontSize: 12),
maxLines: 3,
overflow: TextOverflow.ellipsis,
),
],
),
),
),
),
);
}
@override
void dispose() {
_animation.dispose();
super.dispose();
}
}
user_tile.dart
import 'package:facebook_desktop/screens/home/components/section.dart';
import 'package:flutter/material.dart';
class UserTile extends StatelessWidget {
final String name;
final String image;
final Widget trailing;
const UserTile({
Key key,
this.name,
this.image,
this.trailing,
}) : super(key: key);
@override
Widget build(BuildContext context) {
return Row(
crossAxisAlignment: CrossAxisAlignment.start,
children: [
Container(
margin: const EdgeInsets.only(right: 10),
decoration: BoxDecoration(
color: Colors.white,
borderRadius: BorderRadius.circular(10),
boxShadow: [
BoxShadow(
color: Colors.black.withOpacity(.1),
blurRadius: 5,
offset: Offset(0, 2),
),
],
),
child: ClipRRect(
borderRadius: BorderRadius.circular(5),
child: Image(
image: NetworkImage(
image,
),
fit: BoxFit.cover,
height: 50,
width: 50,
),
),
),
Column(
crossAxisAlignment: CrossAxisAlignment.start,
children: [
SectionTitle(
title: name,
),
SizedBox(
height: 5,
),
Text(
'12 min ago',
style: TextStyle(color: Colors.grey),
),
],
),
if (trailing != null)
Expanded(
child: Align(
alignment: Alignment.topRight,
child: trailing
),
),
],
);
}
}
しかし、すべてが見た目ほど単純なわけではありません。その過程で、KivyMDライブラリに「バッジ」タイプのボタンがないことを発見しました。ちなみに、Flutterプロジェクトでもカスタムボタンを使用していました。したがって、適切なツールバーを作成するには、そのようなボタンを自分で作成する必要がありました。
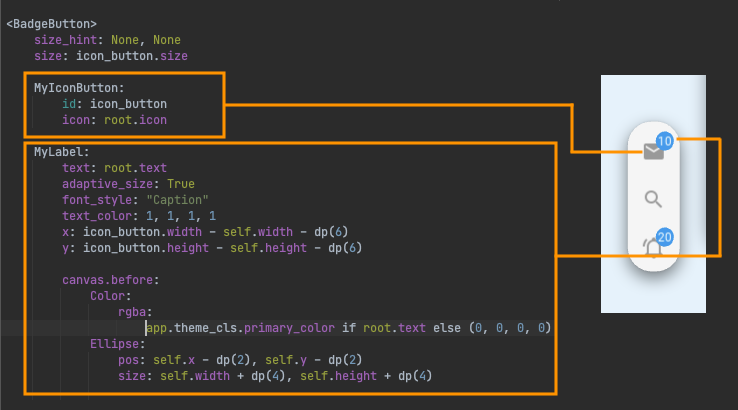
基本Pythonクラス:
from kivy.properties import StringProperty
from kivymd.uix.relativelayout import MDRelativeLayout
class BadgeButton(MDRelativeLayout):
icon = StringProperty()
text = StringProperty()
そして、すでに左側のツールバー

を作成します。「バッジ」などのカスタムボタンを作成する必要があることを考慮しても、Python / Kivyの左側のツールバーのコードは短くなりました-58行のコード、Dart / Flutterでの実装-97行。
button.dart
import 'package:flutter/material.dart';
class LeftBarButton extends StatelessWidget {
final IconData icon;
final String badge;
const LeftBarButton({
Key key,
this.icon,
this.badge,
}) : super(key: key);
@override
Widget build(BuildContext context) {
return GestureDetector(
child: Stack(
children: [
Container(
padding: const EdgeInsets.all(10),
child: Icon(
icon,
color: Colors.grey.withOpacity(.6),
),
),
if (badge != null)
Positioned(
top: 5,
right: 2,
child: Container(
padding: const EdgeInsets.all(3),
decoration: BoxDecoration(
borderRadius: BorderRadius.circular(100),
color: Colors.blue,
),
child: Text(
badge,
style: TextStyle(
color: Colors.white,
fontSize: 10,
),
),
),
)
],
),
);
}
}
widget.dart
import 'package:facebook_desktop/screens/home/left_bar/button.dart';
import 'package:flutter/material.dart';
import 'package:flutter/widgets.dart';
import 'package:flutter_feather_icons/flutter_feather_icons.dart';
class LeftBar extends StatelessWidget {
@override
Widget build(BuildContext context) {
return Container(
margin: const EdgeInsets.all(30),
padding: const EdgeInsets.all(5),
decoration: BoxDecoration(
color: Colors.white,
borderRadius: BorderRadius.circular(50),
boxShadow: [
BoxShadow(
color: Colors.grey.withOpacity(.1),
blurRadius: 2,
offset: Offset(0, 4),
)
],
),
child: Column(
mainAxisSize: MainAxisSize.min,
children: [
LeftBarButton(
icon: FeatherIcons.mail,
badge: '10',
),
SizedBox(
height: 5,
),
LeftBarButton(
icon: FeatherIcons.search,
),
SizedBox(
height: 5,
),
LeftBarButton(
icon: FeatherIcons.bell,
badge: '20',
),
],
),
);
}
}
もちろん、私はFlutterフレームワークのメリットを軽視していません。ツールは素晴らしいです!Python開発者に、Flutterと同じことができることを示したかったのですが、KivyフレームワークとKivyMDライブラリを使用してお気に入りのプログラミング言語で実行できます。モバイルプラットフォームに関しては、ここで、Flutterが速度の点でKivyを上回っていることを認識する価値があります。しかし、それは別の記事です... Python / Kivy / KivyMD実装のFlutterDesktopプロジェクトで構築されたFacebookDesktopRedesignのリポジトリへのリンク 。