この記事では、問題とその解決策のオプションの分析について説明します。私はすべてのモンスターに対して銀の弾丸を与えることはしませんが、彼のために特別に弾丸を作成するために特定のモンスターをどのように研究できるかを示します。これを分析して、フラグメントの変化のアニメーションをボトムシートと親しくする方法の例を使用します。
ダイヤモンドチェックアウト:背景
ダイヤモンドチェックアウトは、プロジェクトのコードネームです。その意味は非常に単純です-注文の最終段階でクライアントが費やす時間を減らすことです。古いバージョンでは、注文を行うために2つの画面で少なくとも4回のクリックが必要でしたが(新しい画面はそれぞれ、ユーザーによるコンテキストの損失の可能性があります)、「ダイアモンドチェックアウト」は理想的には1つの画面で1回クリックするだけで済みます。
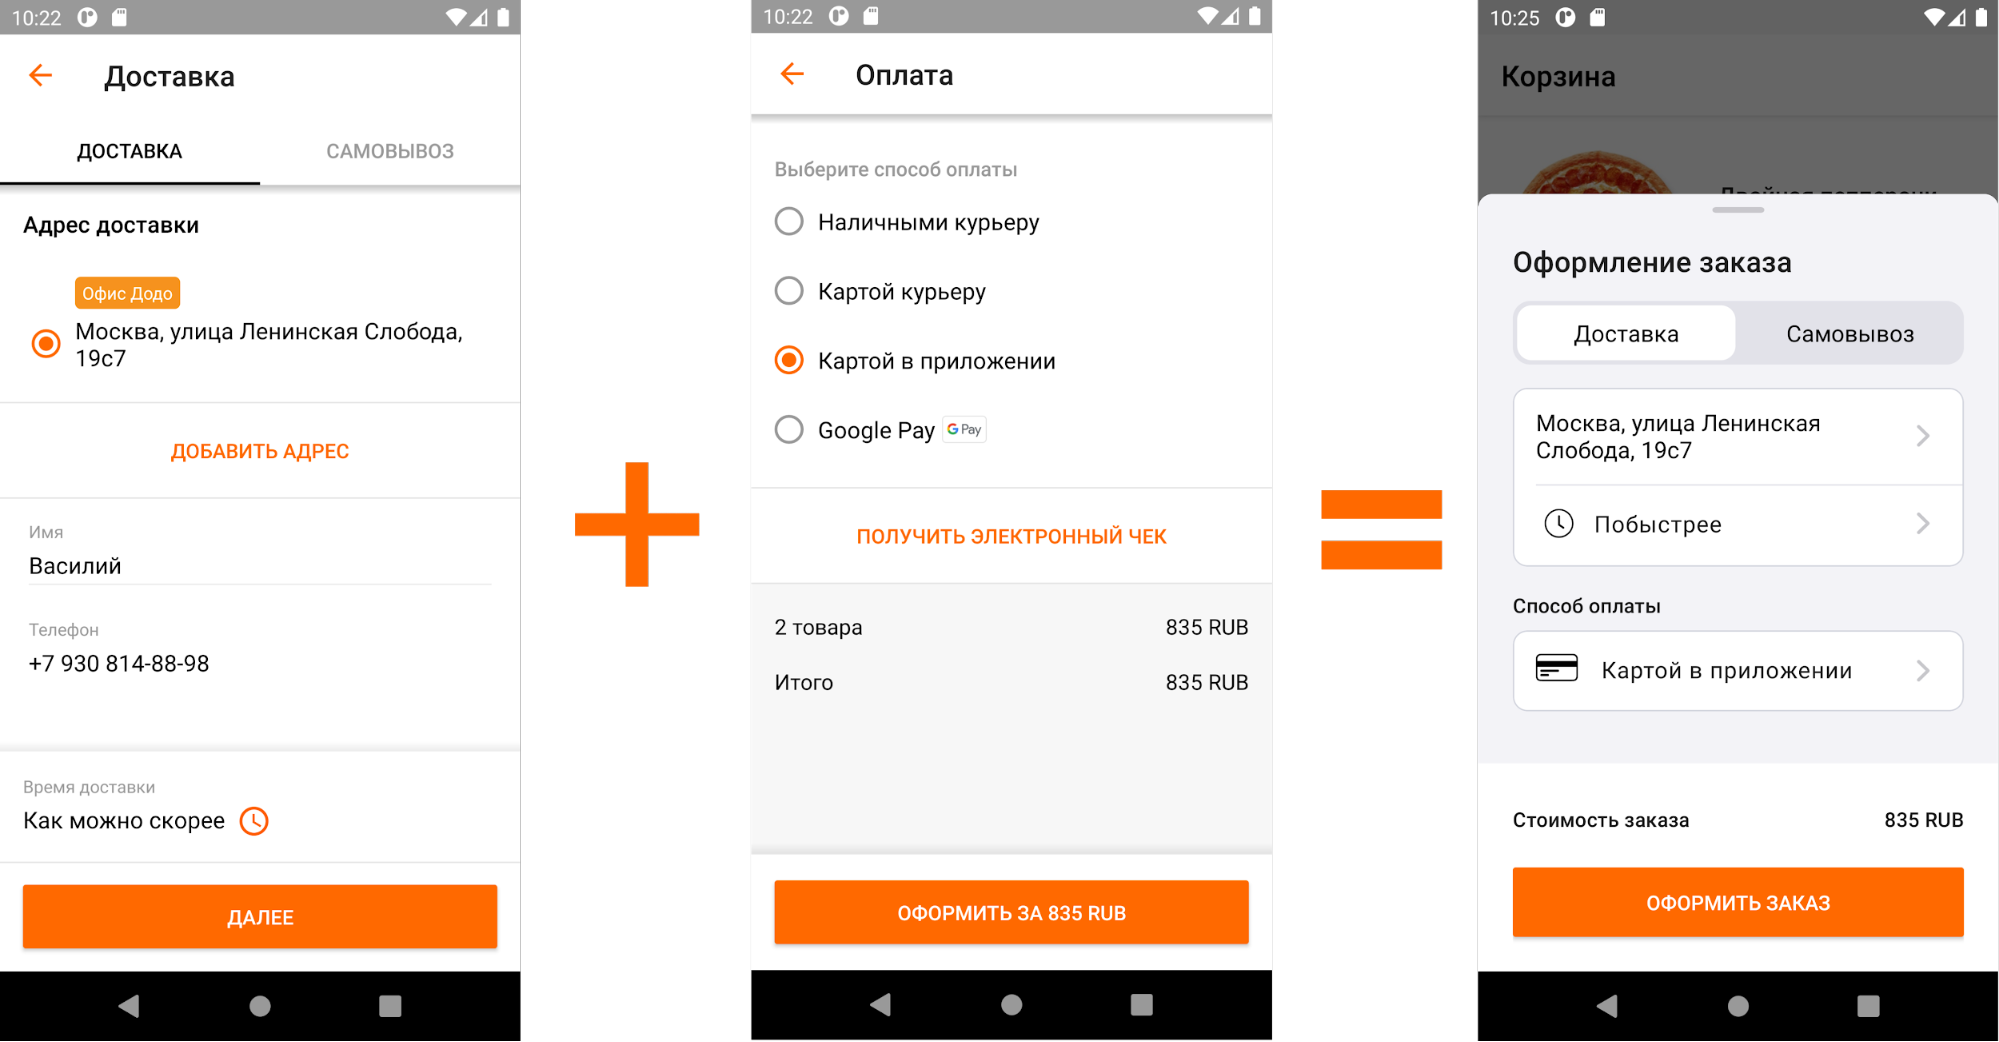
古いチェックアウトと新しいチェックアウトの比較
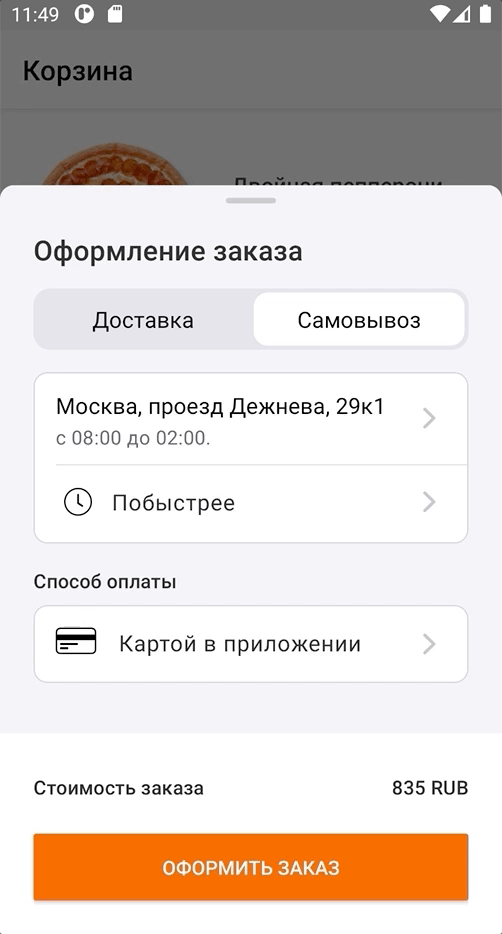
新しいスクリーンを「カーテン」と呼びます。写真では、デザイナーからのタスクの受け取り方を確認できます。この設計ソリューションは標準であり、マテリアルデザインで説明されているボトムシートの名前で知られています(Androidを含む))そして、多くのアプリケーションでさまざまなバリエーションで使用されます。Googleは、モーダルと永続の2つの既成の実装オプションを提供しています。これらのアプローチの違いは、に記載されている多くの、多くの記事。

私たちはカーテンがモーダルでハッピーエンドに近いと判断しましたが、デザインチームは警戒していて、これをそれほど簡単には起こさせませんでした。
iOSのすばらしいアニメーションをご覧ください。同じことをしましょうか?
そのような挑戦を拒否することはできませんでした!さて、「デザイナーが突然アニメーションを作ろうと思った」と冗談を言っただけですが、iOSに関する部分は本当です。
画面間の標準的なトランジション(つまり、トランジションがないこと)は見た目は悪くありませんが、「ダイヤモンドチェックアウト」のタイトルには達していません。冗談ですが、本当にひどいものでした。

「すぐに使える」もの
アニメーションの実装の説明に進む前に、以前のトランジションの様子を説明します。
- クライアントはピッツェリアのアドレスフィールドをクリックしました->それに応じて、「ピックアップ」フラグメントが開かれました。全画面で(意図したとおりに)急激にジャンプして開きましたが、ピザ屋のリストは少し遅れて表示されました。
- クライアントが「戻る」を押したとき->前の画面への戻りは急激なジャンプで起こりました。
- 支払い方法フィールドをクリックしたとき->下から、「支払い方法」フラグメントが急激にジャンプして開きました。お支払い方法の一覧が遅れて表示されましたが、表示されると画面がジャンプして大きくなりました。
- 「戻る」を押すと、急なジャンプで戻ります。
データの表示の遅延は、画面に非同期で読み込まれるために発生します。これを将来的に考慮する必要があります。
実際、何が問題なのか:クライアントが気分が良いところ、そこには制限があります
画面上で急激な動きが多すぎると、ユーザーはそれを好まないでしょう。それは気を散らし、混乱させます。また、けいれんではなく、常に自分の行動にスムーズに反応することを望んでいます。
これにより、技術的な制限が生じました。現在のボトムシートを閉じて、画面が変わるたびに新しいシートを表示することはできないと判断しました。また、複数のボトムシートを上下に表示することも好ましくありません。したがって、実装のフレームワーク内で(各画面は新しいフラグメントです)、ユーザーのアクションに応じて可能な限りスムーズに移動する必要があるボトムシートを1つだけ作成できます。
これは、高さが動的なフラグメントコンテナーがあり(すべてのフラグメントの高さが異なるため)、その高さの変化をアニメーション化する必要があることを意味します。
予備のマークアップ
「カーテン」のルート要素は非常に単純です。これは、上部に角が丸い長方形の背景と、フラグメントが配置されるコンテナーです。
<?xml version="1.0" encoding="utf-8"?>
<FrameLayout xmlns:android="http://schemas.android.com/apk/res/android"
    android:layout_width="match_parent"
    android:layout_height="wrap_content"
    android:background="@drawable/dialog_gray200_background"
    >

  <androidx.fragment.app.FragmentContainerView
      android:id="@+id/container"
      android:layout_width="match_parent"
      android:layout_height="match_parent"
      />

</FrameLayout>
そして、dialog_gray200_background.xmlファイルは次のようになります。
<?xml version="1.0" encoding="utf-8"?>
<selector xmlns:android="http://schemas.android.com/apk/res/android">
  <item>
    <shape android:shape="rectangle">
      <solid android:color="@color/gray200" />
      <corners android:bottomLeftRadius="0dp" android:bottomRightRadius="0dp" android:topLeftRadius="10dp" android:topRightRadius="10dp" />
    </shape>
  </item>
</selector>
新しい各画面は個別のフラグメントであり、フラグメントはreplaceメソッドを使用して置き換えられます。ここではすべてが標準です。
アニメーションを実装する最初の試み
animateLayoutChanges
古代のエルフの魔法のanimateLayoutChangesを思い出しましょう。これは実際にはデフォルトのLayoutTransitionです。animateLayoutChangesはフラグメントを変更するために設計されていませんが、高さのアニメーションに役立つことが期待されています。また、FragmentContainerViewはanimateLayoutChangesをサポートしていないため、古き良きFrameLayoutに変更します。
<?xml version="1.0" encoding="utf-8"?>
<FrameLayout xmlns:android="http://schemas.android.com/apk/res/android"
    android:layout_width="match_parent"
    android:layout_height="wrap_content"
    android:background="@drawable/dialog_gray200_background"
    >

  <FrameLayout
      android:id="@+id/container"
      android:layout_width="match_parent"
      android:layout_height="match_parent"
      android:animateLayoutChanges="true"
      />

</FrameLayout>
実行:

animateLayoutChangesご覧の
とおり、フラグメントを変更すると、コンテナの高さの変更が実際にアニメーション化されます。ピックアップ画面に移動しても問題ないように見えますが、それ以外にはまだ多くのことが望まれています。
直感は、このパスがデザイナーのけいれん的な眼につながることを示唆しているので、変更をロールバックして別のことを試みます。
setCustomAnimations
FragmentTransactionでは、setCustomAnimationメソッドを使用して、xml形式で記述されたアニメーションを設定できます。これを行うには、リソース内に「anim」という名前のフォルダーを作成し、そこに4つのアニメーションファイルを追加します:
to_right_out.xml
<?xml version="1.0" encoding="utf-8"?>
<set xmlns:android="http://schemas.android.com/apk/res/android"
    android:duration="500"
    android:interpolator="@android:anim/accelerate_interpolator"
>
  <translate android:toXDelta="100%" />
</set>
to_right_in.xml
<?xml version="1.0" encoding="utf-8"?>
<set xmlns:android="http://schemas.android.com/apk/res/android"
    android:duration="500"
    android:interpolator="@android:anim/accelerate_interpolator"
>
  <translate android:fromXDelta="-100%" />
</set>
to_left_out.xml
<?xml version="1.0" encoding="utf-8"?>
<set xmlns:android="http://schemas.android.com/apk/res/android"
    android:duration="500"
    android:interpolator="@android:anim/accelerate_interpolator"
>
  <translate android:toXDelta="-100%" />
</set>
to_left_in.xml
<?xml version="1.0" encoding="utf-8"?>
<set xmlns:android="http://schemas.android.com/apk/res/android"
    android:duration="500"
    android:interpolator="@android:anim/accelerate_interpolator"
>
  <translate android:fromXDelta="100%" />
</set>
次に、これらのアニメーションをトランザクションに設定します。
fragmentManager
    .beginTransaction()
    .setCustomAnimations(R.anim.to_left_in, R.anim.to_left_out, R.anim.to_right_in, R.anim.to_right_out)
    .replace(containerId, newFragment)
    .addToBackStack(newFragment.tag)
    .commit()
次の結果が得られます。

setCustomAnimation
この実装で得られるもの:
- それはすでに良くなっています-ユーザーの操作に応じて画面が互いにどのように入れ替わるかを見ることができます。
- しかし、破片の高さが異なるため、まだジャンプがあります。これは、階層内でフラグメントを移動するときにフラグメントが1つしかないという事実によるものです。自分でコンテナの高さを調整するのは彼であり、2番目は「どうやって起こったのか」を表示します。
- 支払い方法に関するデータの非同期読み込みにはまだ問題があります。最初に画面が空白になり、その後コンテンツが表示されます。
これはダメです。結論:他に何かが必要です。
または、突然何かを試してください:共有要素の移行
ほとんどのAndroid開発者は、共有要素の移行について知っています。ただし、このツールは非常に柔軟性がありますが、多くの人はこのツールを使用する際に問題に直面しているため、あまり使用しません。

その本質は非常に単純です。あるフラグメントから別のフラグメントへの要素の遷移をアニメーション化できます。たとえば、最初のフラグメントの要素をアニメーションで「初期要素」と呼び、2番目のフラグメントの要素の場所に移動します(この要素を「最終要素」と呼びます)。最初のフラグメントの残りの要素をフェードし、2番目のフラグメントをフェードで表示します。あるフラグメントから別のフラグメントにアニメーション化する必要がある要素は、共有要素と呼ばれます。
共有要素を設定するには、次のものが必要です。
- 開始要素と終了要素に同じ値のtransitionName属性を付けます。
- 2番目のチャンクにsharedElementEnterTransitionを指定します。
フラグメントのルートビューを共有要素として使用するとどうなりますか?おそらく、Shared Element Transitionはこのために発明されたのではないでしょう。ただし、考えてみると、このソリューションが機能しない理由を見つけるのは困難です。2つのフラグメント間で開始要素を終了要素にアニメーション化したいとします。イデオロギーに矛盾はありません。やってみよう!
「カーテン」の内側にあるフラグメントごとに、ルートビューで、同じ値のtransitionName属性を指定します。
<?xml version="1.0" encoding="utf-8"?>
<androidx.constraintlayout.widget.ConstraintLayout
    xmlns:android="http://schemas.android.com/apk/res/android"
    xmlns:app="http://schemas.android.com/apk/res-auto"
    xmlns:tools="http://schemas.android.com/tools"
    android:layout_width="match_parent"
    android:layout_height="wrap_content"
    android:transitionName="checkoutTransition"
>重要:チャンクトランザクションでREPLACEを使用しているため、これは機能します。ADDを使用している場合(またはADDを使用し、前のスニペットをpreviousFragment.hide()で非表示にしている場合(これを行わないでください))、transitionNameは動的に設定し、アニメーションの終了後にクリアする必要があります。現在のビュー階層のある時点で、同じtransitionNameを持つ2つのビューは存在できないため、これを行う必要があります。これは実行できますが、そのようなハックなしで実行できればより良いでしょう。本当にADDを使用する必要がある場合は、この記事で実装のヒントを見つけることができます。
次に、Transitionクラスを指定する必要があります。これは、トランジションがどのように進むかを担当します。まず、何も設定されていないことを確認しましょう-AutoTransitionを使用します。
newFragment.sharedElementEnterTransition = AutoTransition()また、フラグメントトランザクションでアニメーション化する共有要素を設定する必要があります。私たちの場合、これはフラグメントのルートビューになります。
fragmentManager
    .beginTransaction()
    .apply{
      if (Build.VERSION.SDK_INT >= Build.VERSION_CODES.LOLLIPOP) {
        addSharedElement(currentFragment.requireView(), currentFragment.requireView().transitionName)
        setReorderingAllowed(true)
      }
    }
    .replace(containerId, newFragment)
    .addToBackStack(newFragment.tag)
    .commit()
重要:transitionName(Transition API全体と同様)は、Android Lollipopから利用できることに注意してください。
何が起きたのか見てみましょう:

AutoTransition
Transitionは機能しましたが、まあまあです。これは、チャンクトランザクション中は、新しいチャンクのみがビュー階層にあるためです。このフラグメントは、コンテナをそのサイズに拡大または縮小し、その後、トランジションを使用してアニメーションを開始します。このため、新しいフラグメントの高さが前のフラグメントよりも高い場合にのみアニメーションが表示されます。
標準の実装ではうまくいかなかったので、どうすればよいでしょうか。もちろん、
トランジションを書く
Transitionは、2つのシーン(シーン)間のアニメーションの作成を担当するTransition APIのクラスです。このAPIの主な要素:
- シーンは、特定の時点での画面上の要素の配置(レイアウト)と、アニメーションが発生するViewGroup(sceneRoot)です。
- 開始シーンは、開始時のシーンです。
- 終了シーンは、終了時点のシーンです。
- トランジションは、開始シーンと終了シーンのプロパティを収集し、それらの間でアニメーション化するアニメータを作成するクラスです。
Transitionクラスでは4つのメソッドを使用します。
- fun getTransitionProperties():配列。このメソッドは、アニメーション化される一連のプロパティを返す必要があります。このメソッドから、文字列(キー)の配列を自由形式で返す必要があります。主なことは、captureStartValuesおよびcaptureEndValuesメソッド(以下で説明)がこれらのキーを使用してプロパティを書き込むことです。以下に例を示します。
- fun captureStartValues(transitionValues: TransitionValues). layout' . , , , .
- fun captureEndValues(transitionValues: TransitionValues). , layout' .
- fun createAnimator(sceneRoot: ViewGroup?, startValues: TransitionValues?, endValues: TransitionValues?): Animator?. , , . , , .
Transition
- , Transition.
@TargetApi(VERSION_CODES.LOLLIPOP) class BottomSheetSharedTransition : Transition { @Suppress("unused") constructor() : super() @Suppress("unused") constructor( context: Context?, attrs: AttributeSet? ) : super(context, attrs) } - getTransitionProperties.
View, PROP_HEIGHT, ( ) :
companion object { private const val PROP_HEIGHT = "heightTransition:height" private val TransitionProperties = arrayOf(PROP_HEIGHT) } override fun getTransitionProperties(): Array<String> = TransitionProperties - captureStartValues.
View, transitionValues. transitionValues.values ( Map) c PROP_HEIGHT:
override fun captureStartValues(transitionValues: TransitionValues) {
  transitionValues.values[PROP_HEIGHT] = transitionValues.view.height
}
, . , . , - . « » , , . , . :
override fun captureStartValues(transitionValues: TransitionValues) { // View... transitionValues.values[PROP_HEIGHT] = transitionValues.view.height // ... transitionValues.view.parent .let { it as? View } ?.also { view -> view.updateLayoutParams<ViewGroup.LayoutParams> { height = view.height } } } - captureEndValues.
, View. . . , . . , , , . — view, , . :
override fun captureEndValues(transitionValues: TransitionValues) {
  //     View
  transitionValues.values[PROP_HEIGHT] = getViewHeight(transitionValues.view.parent as View)
}
getViewHeight:
private fun getViewHeight(view: View): Int {
  //
  val deviceWidth = getScreenWidth(view)

  //  View
  val widthMeasureSpec = MeasureSpec.makeMeasureSpec(deviceWidth, MeasureSpec.EXACTLY)
  val heightMeasureSpec = MeasureSpec.makeMeasureSpec(0, MeasureSpec.UNSPECIFIED)

  return view
      //
      .apply { measure(widthMeasureSpec, heightMeasureSpec) }
      //
      .measuredHeight
      //  View       ,
      .coerceAtMost(getScreenHeight(view))
}

private fun getScreenHeight(view: View) =
  getDisplaySize(view).y - getStatusBarHeight(view.context)

private fun getScreenWidth(view: View) =
  getDisplaySize(view).x

private fun getDisplaySize(view: View) =
  Point().also {
    (view.context.getSystemService(
        Context.WINDOW_SERVICE
    ) as WindowManager).defaultDisplay.getSize(it)
  }

private fun getStatusBarHeight(context: Context): Int =
  context.resources
      .getIdentifier("status_bar_height", "dimen", "android")
      .takeIf { resourceId -> resourceId > 0 }
      ?.let { resourceId -> context.resources.getDimensionPixelSize(resourceId) }
      ?: 0
, , — . - . Fade in.
, . . «BottomSheetSharedTransition», :
private fun prepareFadeInAnimator(view: View): Animator = ObjectAnimator.ofFloat(view, View.ALPHA, 0f, 1f) - . .
, :
private fun prepareHeightAnimator(
    startHeight: Int,
    endHeight: Int,
    view: View
) = ValueAnimator.ofInt(startHeight, endHeight)
    .apply {
        val container = view.parent.let { it as View }

        //
        addUpdateListener { animation ->
            container.updateLayoutParams<ViewGroup.LayoutParams> {
                height = animation.animatedValue as Int
            }
        }
    }
ValueAnimator . , . , . , , . , WRAP_CONTENT. , :
private fun prepareHeightAnimator(
    startHeight: Int,
    endHeight: Int,
    view: View
) = ValueAnimator.ofInt(startHeight, endHeight)
    .apply {
        val container = view.parent.let { it as View }

        //
        addUpdateListener { animation ->
            container.updateLayoutParams<ViewGroup.LayoutParams> {
                height = animation.animatedValue as Int
            }
        }

        //      WRAP_CONTENT
        doOnEnd {
            container.updateLayoutParams<ViewGroup.LayoutParams> {
                height = ViewGroup.LayoutParams.WRAP_CONTENT
            }
        }
    }
, . - . createAnimator.
override fun createAnimator( sceneRoot: ViewGroup?, startValues: TransitionValues?, endValues: TransitionValues? ): Animator? { if (startValues == null || endValues == null) { return null } val animators = listOf<Animator>( prepareHeightAnimator( startValues.values[PROP_HEIGHT] as Int, endValues.values[PROP_HEIGHT] as Int, endValues.view ), prepareFadeInAnimator(endValues.view) ) return AnimatorSet() .apply { interpolator = FastOutSlowInInterpolator() duration = ANIMATION_DURATION playTogether(animators) } } - .
Transititon'. , . , . «createAnimator» . ?
- Fade' , .
- «captureStartValues» , , WRAP_CONTENT.
, . : , , Transition'. :
companion object {
    private const val PROP_HEIGHT = "heightTransition:height"
    private const val PROP_VIEW_TYPE = "heightTransition:viewType"

    private val TransitionProperties = arrayOf(PROP_HEIGHT, PROP_VIEW_TYPE)
}

override fun getTransitionProperties(): Array<String> = TransitionProperties

override fun captureStartValues(transitionValues: TransitionValues) {
    //    View...
    transitionValues.values[PROP_HEIGHT] = transitionValues.view.height
    transitionValues.values[PROP_VIEW_TYPE] = "start"

    // ...
    transitionValues.view.parent
        .let { it as? View }
        ?.also { view ->
            view.updateLayoutParams<ViewGroup.LayoutParams> {
                height = view.height
            }
        }

}

override fun captureEndValues(transitionValues: TransitionValues) {
    //     View
    transitionValues.values[PROP_HEIGHT] = getViewHeight(transitionValues.view.parent as View)
    transitionValues.values[PROP_VIEW_TYPE] = "end"
}
, «PROP_VIEW_TYPE», «captureStartValues» «captureEndValues» . , ! - Transition.
newFragment.sharedElementEnterTransition = BottomSheetSharedTransition()
アニメーションを時間どおりに開始して見栄えをよくするためには、データが読み込まれるまで、フラグメント間の遷移(したがってアニメーション)を延期するだけです。これを行うには、フラグメント内でpostponeEnterTransitionメソッドを呼び出します。長いデータ読み込みタスクが完了したら、startPostponedEnterTransitionを呼び出すことを忘れないでください。あなたはこのトリックについて知っていると思いますが、もう一度思い出させるのに害はありません。
すべて一緒に:最後に何が起こったのか
新しいBottomSheetSharedTransitionを使用し、非同期でデータを読み込むときにpostponeEnterTransitionを使用すると、次のアニメーションが得られます。
スポイラーの下には、既製のクラスBottomSheetSharedTransitionがあります。
package com.maleev.bottomsheetanimation

import android.animation.Animator
import android.animation.AnimatorSet
import android.animation.ObjectAnimator
import android.animation.ValueAnimator
import android.annotation.TargetApi
import android.content.Context
import android.graphics.Point
import android.os.Build
import android.transition.Transition
import android.transition.TransitionValues
import android.util.AttributeSet
import android.view.View
import android.view.ViewGroup
import android.view.WindowManager
import android.view.animation.AccelerateInterpolator
import androidx.core.animation.doOnEnd
import androidx.core.view.updateLayoutParams

@TargetApi(Build.VERSION_CODES.LOLLIPOP)
class BottomSheetSharedTransition : Transition {

    @Suppress("unused")
    constructor() : super()

    @Suppress("unused")
    constructor(
        context: Context?,
        attrs: AttributeSet?
    ) : super(context, attrs)

    companion object {
        private const val PROP_HEIGHT = "heightTransition:height"

        // the property PROP_VIEW_TYPE is workaround that allows to run transition always
        // even if height was not changed. It's required as we should set container height
        // to WRAP_CONTENT after animation complete
        private const val PROP_VIEW_TYPE = "heightTransition:viewType"
        private const val ANIMATION_DURATION = 400L

        private val TransitionProperties = arrayOf(PROP_HEIGHT, PROP_VIEW_TYPE)
    }

    override fun getTransitionProperties(): Array<String> = TransitionProperties

    override fun captureStartValues(transitionValues: TransitionValues) {
        //    View...
        transitionValues.values[PROP_HEIGHT] = transitionValues.view.height
        transitionValues.values[PROP_VIEW_TYPE] = "start"

        // ...
        transitionValues.view.parent
            .let { it as? View }
            ?.also { view ->
                view.updateLayoutParams<ViewGroup.LayoutParams> {
                    height = view.height
                }
            }

    }

    override fun captureEndValues(transitionValues: TransitionValues) {
        //     View
        transitionValues.values[PROP_HEIGHT] = getViewHeight(transitionValues.view.parent as View)
        transitionValues.values[PROP_VIEW_TYPE] = "end"
    }

    override fun createAnimator(
        sceneRoot: ViewGroup?,
        startValues: TransitionValues?,
        endValues: TransitionValues?
    ): Animator? {
        if (startValues == null || endValues == null) {
            return null
        }

        val animators = listOf<Animator>(
            prepareHeightAnimator(
                startValues.values[PROP_HEIGHT] as Int,
                endValues.values[PROP_HEIGHT] as Int,
                endValues.view
            ),
            prepareFadeInAnimator(endValues.view)
        )

        return AnimatorSet()
            .apply {
                duration = ANIMATION_DURATION
                playTogether(animators)
            }
    }

    private fun prepareFadeInAnimator(view: View): Animator =
        ObjectAnimator
            .ofFloat(view, "alpha", 0f, 1f)
            .apply { interpolator = AccelerateInterpolator() }

    private fun prepareHeightAnimator(
        startHeight: Int,
        endHeight: Int,
        view: View
    ) = ValueAnimator.ofInt(startHeight, endHeight)
        .apply {
            val container = view.parent.let { it as View }

            //
            addUpdateListener { animation ->
                container.updateLayoutParams<ViewGroup.LayoutParams> {
                    height = animation.animatedValue as Int
                }
            }

            //      WRAP_CONTENT
            doOnEnd {
                container.updateLayoutParams<ViewGroup.LayoutParams> {
                    height = ViewGroup.LayoutParams.WRAP_CONTENT
                }
            }
        }

    private fun getViewHeight(view: View): Int {
        //
        val deviceWidth = getScreenWidth(view)

        //  View
        val widthMeasureSpec =
            View.MeasureSpec.makeMeasureSpec(deviceWidth, View.MeasureSpec.EXACTLY)
        val heightMeasureSpec =
            View.MeasureSpec.makeMeasureSpec(0, View.MeasureSpec.UNSPECIFIED)

        return view
            // :
            .apply { measure(widthMeasureSpec, heightMeasureSpec) }
            //   :
            .measuredHeight
            //  View       ,     :
            .coerceAtMost(getScreenHeight(view))
    }

    private fun getScreenHeight(view: View) =
        getDisplaySize(view).y - getStatusBarHeight(view.context)

    private fun getScreenWidth(view: View) =
        getDisplaySize(view).x

    private fun getDisplaySize(view: View) =
        Point().also { point ->
            view.context.getSystemService(Context.WINDOW_SERVICE)
                .let { it as WindowManager }
                .defaultDisplay
                .getSize(point)
        }

    private fun getStatusBarHeight(context: Context): Int =
        context.resources
            .getIdentifier("status_bar_height", "dimen", "android")
            .takeIf { resourceId -> resourceId > 0 }
            ?.let { resourceId -> context.resources.getDimensionPixelSize(resourceId) }
            ?: 0
}
既製のTransitionクラスがある場合、そのアプリケーションは簡単なステップになります。
ステップ1.フラグメントトランザクションで、共有要素を追加し、Transitionを設定します。
private fun transitToFragment(newFragment: Fragment) {
    val currentFragmentRoot = childFragmentManager.fragments[0].requireView()

    childFragmentManager
        .beginTransaction()
        .apply {
            if (Build.VERSION.SDK_INT >= Build.VERSION_CODES.LOLLIPOP) {
                addSharedElement(currentFragmentRoot, currentFragmentRoot.transitionName)
                setReorderingAllowed(true)

                newFragment.sharedElementEnterTransition = BottomSheetSharedTransition()
            }
        }
        .replace(R.id.container, newFragment)
        .addToBackStack(newFragment.javaClass.name)
        .commit()
}
ステップ2. BottomSheetDialogFragment内でアニメーション化する必要があるフラグメント(現在のフラグメントと次のフラグメント)のマークアップで、transitionNameを設定します。
<?xml version="1.0" encoding="utf-8"?>
<androidx.constraintlayout.widget.ConstraintLayout
    xmlns:android="http://schemas.android.com/apk/res/android"
    xmlns:app="http://schemas.android.com/apk/res-auto"
    xmlns:tools="http://schemas.android.com/tools"
    android:layout_width="match_parent"
    android:layout_height="wrap_content"
    android:transitionName="checkoutTransition"
    >
以上で終わりです。
別の方法で行われたのでしょうか?
問題を解決するためのオプションは常にいくつかあります。私たちが試していない他の可能なアプローチに言及したいと思います:
- フラグメントを破棄し、1つのフラグメントを多数のビューで使用し、特定のビューをアニメーション化します。これにより、アニメーションをより詳細に制御できますが、フラグメントの利点を失うことになります。ネイティブナビゲーションサポートとすぐに使えるライフサイクル処理(これは自分で実装する必要があります)です。
- MotionLayout. MotionLayout , , , .
- . , , . Bottom Sheet Bottom Sheet .
- Bottom Sheet . — .
GitHub. Android- ( ) .